Arquivos para educação

Mug, or not Mug, that is the question!

18 18-03:00 março 18-03:00 2022 — Deixe um comentário

EdgeAI made simple – Exploring Image Classification with Arduino Portenta, Edge Impulse, and OpenMV

Introduction

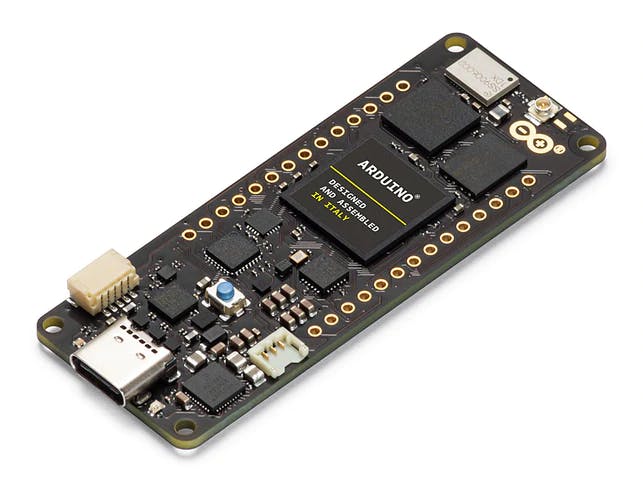
This tutorial explores the Arduino Portenta, a development board that includes two processors that can run tasks in parallel. Portenta can efficiently run processes created with TensorFlow™ Lite. For example, one of the cores computing a computer vision algorithm on the fly (inference), having the other leading with low-level operations like controlling a motor and communicating or acting as a user interface.

The onboard wireless module allows the management of WiFi and Bluetooth® connectivity simultaneously.

image.png

Two Parallel Cores

H7’s central processor is the dual-core STM32H747, including a Cortex® M7 running at 480 MHz and a Cortex® M4 running at 240 MHz. The two cores communicate via a Remote Procedure Call mechanism that seamlessly allows calling functions on the other processor. Both processors share all the on-chip peripherals and can run:

  • Arduino sketches on top of the Arm® Mbed™ OS
  • Native Mbed™ applications
  • MicroPython / JavaScript via an interpreter
  • TensorFlow™ Lite

Memory

Memory is crucial for embedded machine Learning projects. Portenta H7 board can host up to 64 MB of SDRAM and 128 MB of QSPI Flash. In my case, my board comes with 8MB of SDRAM and 16MB of Flash QSPI. But it is essential to consider that the MCU SRAM is the one to be used with machine learning inferences; that for the STM32H747 is only 1MB. This MCU also has incorporated 2MB of FLASH, mainly for code storage.

Vision Shield

We will add a Vision Shield to our Portenta board for use in vision applications, which brings industry-rated features, like Ethernet (or LoRa), camera, and microphones.

image.png
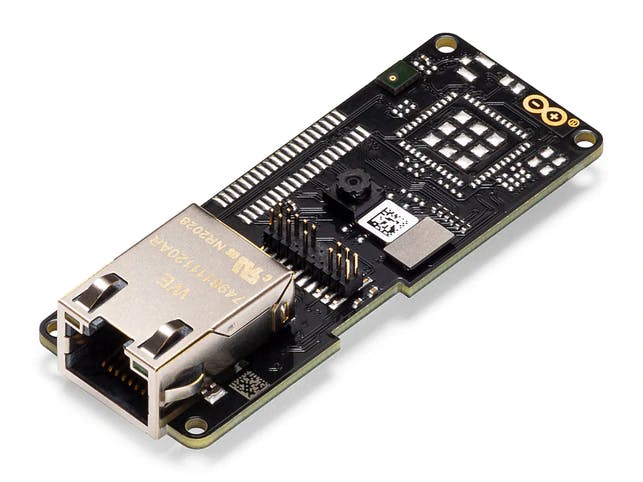
  • Camera: Ultra-low-power Himax HM-01B0 monochrome camera module with 320 x 320 active pixel resolution support for QVGA.
  • Microphone: 2 x MP34DT05, an ultra-compact, low-power, omnidirectional, digital MEMS microphone built with a capacitive sensing element and an IC interface.
Continue lendo…

Learning Image Classification on edge devices (Android)

App Inventor: EdgeML Image Classification: Fruits vs Veggies

A few weeks ago, I wrote a tutorial exploring Image Classification, one of the most popular Machine Learning applications, deployed on a tiny device, the ESP32-CAM. It was an example of a TinyML application.

When we talk about TinyML, it immediately comes to our mind squeezed machine learning models running on embedded devices and consuming very low power. The characteristic of such applications is that we are running AI (or Machine Learning) at the Edge. But power is not always a concern, and so, we can find examples of edge machine learning applications running on more complex devices such as the Raspberry Pi (see my tutorial Exploring AI at the Edge) or even Smart Phones. In short, TinyML can be considered a subset of EdgeML applications. The below figure illustrates this statement:

hw.png

This project will explore an Edge ML application Classifying Images on an Android device.

Developing Android (AI) Apps

Nowadays, developing Android apps using Java or the Kotlin language at Android Studio is not complicated, but you need to take tutorials to gain some domain. However, if you need to develop real professional applications, Laurence Moroney teaches an excellent course, available free at Coursera: Device-based Models with TensorFlow Lite.

But if you are not a developer, do not have the time, or only need a more straightforward app that can be quickly deployed, the MIT App Inventor should be your choice.

MIT App Inventor is an intuitive, visual programming environment that allows everyone – even children – to build fully functional apps for Android phones, iPhones, and Android/iOS tablets.

Only basic AI Applications are available with MIT App Inventor, such as Image and Sound classification, Pose Estimation, etc.

To start, optionally on this tutorial, available at the MIT App Inventor site, you can go step by step to create a general Image Classification App that will run on your Android device. In that project, the Mobilenet model was pre-trained with the ImageNet dataset, which 999 classes can be checked here. I left the project code (.aia) and the executable (.apk) of my version of this App in my GitHub.

img__class_app.-png.png

But what we will explore here in this tutorial is how we can use our images to train a machine learning model to be deployed on an edge device, in this case, an Android tablet.

Continue lendo…

Learning Image Classification on embedding devices (ESP32-CAM)

ESP32-CAM: TinyML Image Classification - Fruits vs Veggies

More and more, we are facing an embedding machine learning revolution. And when we talk about Machine Learning (ML), the first thing that comes to mind is Image Classification, a kind of ML Hello World!

One of the most popular and affordable development boards that already integrates a camera is the ESP32-CAM, which combines an Espressif ESP32-S MCU chip with an ArduCam OV2640 camera.

image.png

The ESP32 chip is so powerful that it can even process images. It includes I2C, SPI, UART communications, and PWM and DAC outputs.

Parameters:

  • Working voltage: 4.75-5.25V
  • splash: Default 32Mbit
  • RAM: Internal 520KB + external 8MB PSRAM
  • Wi-Fi: 802.11b/g/n/e/i
  • Bluetooth: Bluetooth 4.2BR/EDR and BLE standard
  • Support interface (2Mbps): UART, SPI, I2C, PWM
  • Support TF card: maximum support 4G
  • IO port: 9
  • Serial port rate: default 115200bps
  • Spectrum range: 2400 ~2483.5MHz
  • Antenna form: onboard PCB antenna, gain 2dBi
  • Image output format: JPEG (only OV2640 support), BMP, GRAYSCALE
ESP32-S.jpeg

Below, the general board pinout:

image.png

Note that this device has not a USB-TTL Serial module integrated, so to upload a code to the ESP32-CAM will be necessary a special adapter as below:

FTDI Basic.png

Or a USB-TTL Serial Conversion Adapter as below:

If you want to learn about the ESP32-CAM, I strongly recommend the books and tutorials of Rui Santos.

Continue lendo…

TinyML Made Easy: Gesture Recognition

10 10-03:00 fevereiro 10-03:00 2022 — Deixe um comentário

Seeed Wio Terminal programed using Codecraft/Edge Impulse is a fantastic tool for beginners to start on tinyML (Embedded Machine Learning).

TinyML

This project mixes Machine Learning (that is part of Artificial Intelligence) with a small device (Wio Terminal), which is nothing more than a microcontroller and sensors, whose main characteristics are ultra-low power consumption, 32-bit CPU, and a few kilobytes of memory. This new field of engineering is known as Embedded Machine Learning, or tinyML.

As we know, Microcontrollers (or MCUs) are very cheap electronic components, usually with just a few kilobytes of RAM, designed to use tiny amounts of energy. Nowadays, MCUs can be found embedded in almost any consumer, medical, automotive, and industrial devices. It is estimated that over 40 billion microcontrollers are sold every year, and probably hundreds of billions of them are in service nowadays. But, interestingly, those devices don’t get much attention because they’re often only used to replace functionality that older electro-mechanical systems could do in cars, washing machines, or remote controls.

More recently, with the IoT (Internet of Things) era, a significant part of those MCUs is generating “quintillions” of data, that in its majority, is not used due to the high cost and complexity (bandwidth and latency) of data transmission.

On the other side, in recent decades, we have seen a lot of development of Machine Learning models (aka Artificial Intelligence) trained with tons of data in very powerful and hungry mainframes.

But what is happening today is that suddenly, it become possible to take noisy signals like images, audio, or accelerometers and extract meaning from them by using neural networks. And what is more important is that we can run these networks on microcontrollers and sensors themselves using little power, interpreting much more of those sensor data that we are currently ignoring. This is tinyML, a new area that enables machine intelligence right next to the physical world.

The novelty area of tinyML can help bring good to our society.

The Wio Terminal

The Wio Terminal, a very affordable $36 device, is using an ATSAMD51P19 microcontroller with ARM Cortex-M4F running at 120MHz (boost up to 200MHz), 4MB of external flash memory, and 192KB of RAM. Wireless connectivity with Realtek RTL8720DN support. It is compatible with Arduino and MicroPython. It supports both Bluetooth and Wi-Fi providing a solid foundation for IoT and tinyML projects. There is a 2.4- inch LCD screen on Wio Terminal, an onboard IMU (LIS3DHTR), microphone, buzzer, microSD card slot, light sensor, and IR emitter (IR 940nm). Most importantly there are two multi-functional Grove ports onboard for the Grove ecosystem and Raspberry Pi compatible 40-pin GPIO pins for additional add-on support.

Continue lendo…

Emulating a Google Assistant on a RaspberryPi and Arduino Nano 33 BLE (TinyML)

Continue lendo...

Exploring IA at the Edge!

19 19-03:00 agosto 19-03:00 2020 — 1 Comentário

Image Recognition, Object Detection and Pose Estimation using Tensorflow Lite on a Raspberry Pi

Continue lendo...

The idea with this tutorial is to capture tweets and to analyze them regarding the most used words and hashtags, classifying them regarding the sentiment behind them (positive, negative or neutral).

Continue lendo...

Neste tutorial, exploraremos  o ESP32, o mais novo dispositivo para uso no campo do IoT. Esta placa, desenvolvida pela Espressif, deverá ser a sucessora do ESP8266, devido ao seu baixo preço e excelentes recursos.

Mas é importante alertar que NEM TODAS as bibliotecas ou funções com que você está acostumado a trabalhar com ESP8266 e / ou Arduino estão funcionando nesta nova placa. Provavelmente isso ocorrerá em breve, mas neste momento ainda não estão todas. Confire regularmente o fórum do ESP para saber das atualizações: ESP 32 Forum WebPage.

Aqui, aprenderemos a como programar o ESP32 utilizando-se do Arduino IDE, explorando suas funções e bibliotecas mais comuns, apontar algumas das diferenças importantes com o ESP8266, bem como os novos recursos introduzidos neste grande chip.

Em suma, exploraremos:

  • Saída digital: piscar um LED
  • Entrada digital: leitura de um sensor de toque
  • Entrada analógica: leitura de uma tensão variável usando-se de um potenciômetro
  • Saída analógica: controlando o brilho de um LED
  • Saída Analógica: Controlando a posição de um Servo
  • Leitura de dados de temperatura / umidade utilizando-se de um sensor digital
  • Conectando-se à internet para obter o horário local
  • Receber dados de uma página web local simples, ligando / desligando um LED
  • Transmitir dados para uma simples webPage local
  • Incluir um OLED para apresentar localmente os dados capturados pelo sensor DHT (Temperatura e Umidade), bem como a hora local.


Continue lendo…

IoT Made Simple: Monitoring Multiple Sensors

Alguns meses atrás, publiquei aqui um tutorial sobre o monitoramento de temperatura usando o DS18B20, um sensor digital que se comunica através de um barramento de um único fio (bus do tipo “1-wire”), sendo os dados enviados pela à internet com a ajuda de um módulo NodeMCU e o aplicativo Blynk:

O IoT feito simples: Monitorando a temperatura desde qualquer lugar

Mas o que passamos por cima naquele tutorial, foi uma das grandes vantagens desse tipo de sensor que é a possibilidade de coletar dados múltiplos, provenientes de vários sensores conectados ao mesmo barramento de 1 fio (“1-wire”). E agora é hora de também explorá-lo.

Block Diagram.png

Vamos expandir o que foi desenvolvido no último tutorial, monitorando agora dois sensores DS18B20, configurados um em Celsius e outro em Fahrenheit (isto somente para explorar a biblioteca, poderiam ser os dois configurados para Celsius). Os dados serão enviados para uma aplicação Blynk, conforme mostra o diagrama de blocos acima.

Continue lendo…

“Computer, Fire All Weapons!”

30 30-03:00 agosto 30-03:00 2017 — 4 Comentários

Cover3

Este post é na verdade uma continuação de meu último tutorial: Alexa – NodeMCU: Emulando um dispositivo WeMo, onde apresentamos a grande biblioteca fauxmoESP, a qual simplifica muito o código necessário para desenvolver projetos de automação envolvendo a Alexa e a emulação de dispositivos inteligentes utilizando o NodeMCU.

Neste novo tutorial, partiremos desse conceito (emulação de dispositivos WeMo), mas em vez de usar relés para ligar / desligar aparelhos elétricos, “ativaremos” funções mais complexas, onde múltiplos dispositivos estarão envolvidos.

Somente por diversão, simularemos o disparo de algumas armas encontradas na Star Trek Enterprise, tais como Photon Torpedos e Phasers!

O NodeMCU controlará um LED RGB, que será o nosso “Torpedo fotônico” e um LED vermelho nosso “Phaser”. Para dar um efeito mais realista, também incluiremos um Buzzer que gerará algum som junto com o efeito visual.

O diagrama de blocos abaixo mostra o projeto:
No vídeo, voce terá uma idéia de como ficará o projeto final:

Continue lendo…