
Learning Image Classification on embedding devices (ESP32-CAM)
More and more, we are facing an embedding machine learning revolution. And when we talk about Machine Learning (ML), the first thing that comes to mind is Image Classification, a kind of ML Hello World!
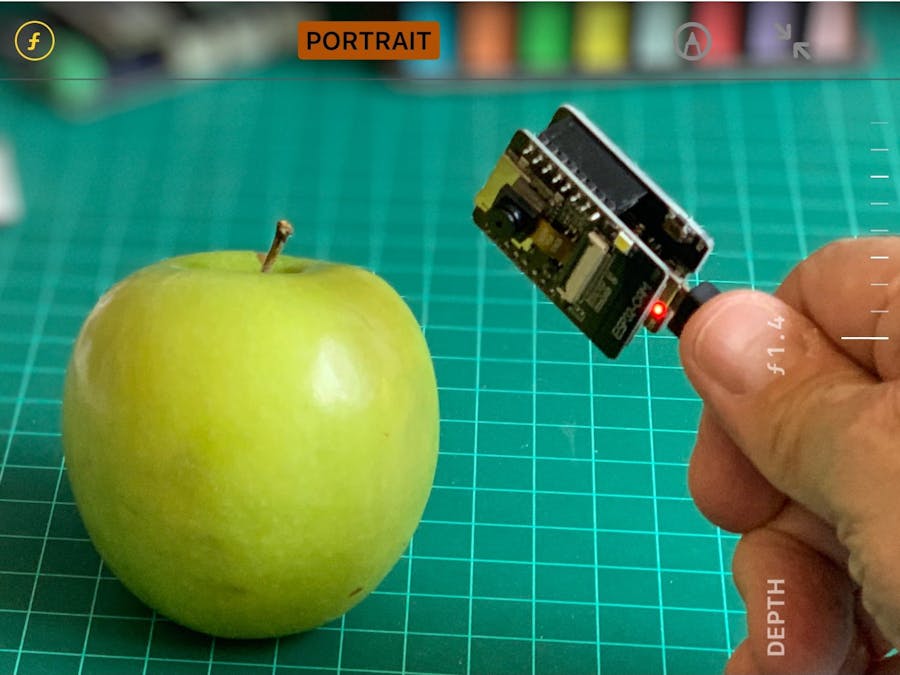
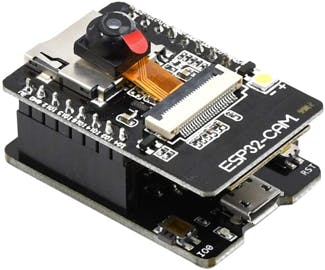
One of the most popular and affordable development boards that already integrates a camera is the ESP32-CAM, which combines an Espressif ESP32-S MCU chip with an ArduCam OV2640 camera.
The ESP32 chip is so powerful that it can even process images. It includes I2C, SPI, UART communications, and PWM and DAC outputs.
Parameters:
- Working voltage: 4.75-5.25V
- splash: Default 32Mbit
- RAM: Internal 520KB + external 8MB PSRAM
- Wi-Fi: 802.11b/g/n/e/i
- Bluetooth: Bluetooth 4.2BR/EDR and BLE standard
- Support interface (2Mbps): UART, SPI, I2C, PWM
- Support TF card: maximum support 4G
- IO port: 9
- Serial port rate: default 115200bps
- Spectrum range: 2400 ~2483.5MHz
- Antenna form: onboard PCB antenna, gain 2dBi
- Image output format: JPEG (only OV2640 support), BMP, GRAYSCALE
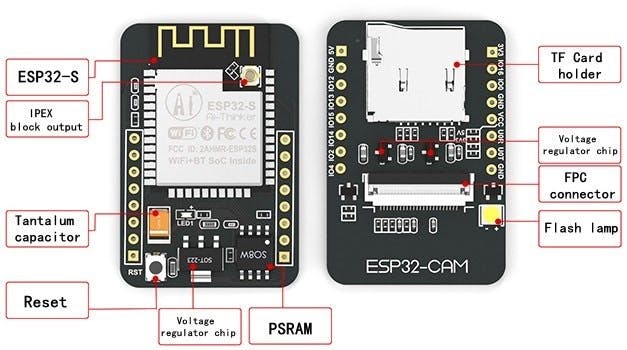
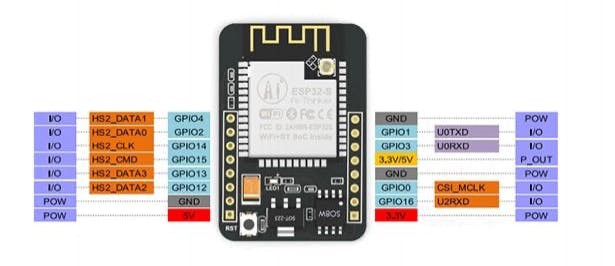
Below, the general board pinout:
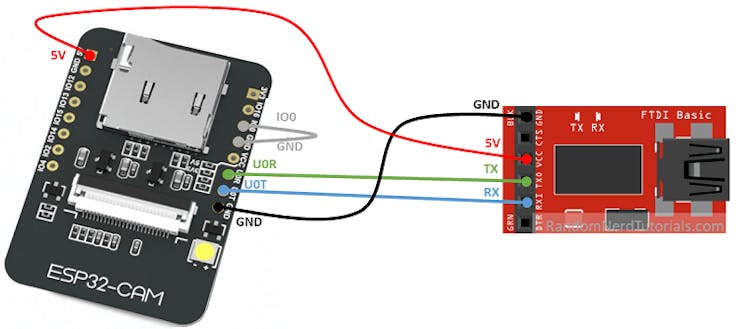
Note that this device has not a USB-TTL Serial module integrated, so to upload a code to the ESP32-CAM will be necessary a special adapter as below:
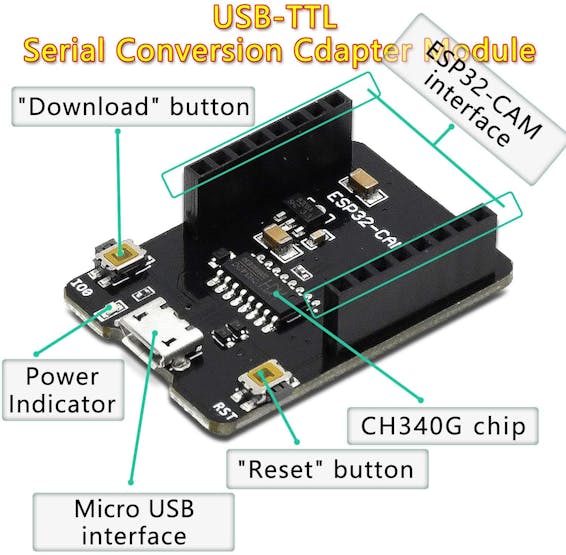
Or a USB-TTL Serial Conversion Adapter as below:
If you want to learn about the ESP32-CAM, I strongly recommend the books and tutorials of Rui Santos.
Installing the ESP32-Cam on Arduino IDE
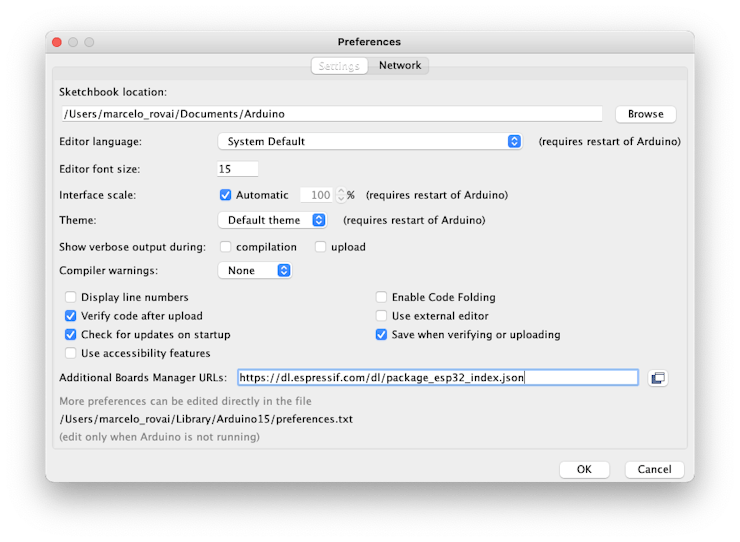
Open the preferences window from the Arduino IDE and go to:
Arduino > Preferences
Enter with the below line:
https://dl.espressif.com/dl/package_esp32_index.json
on the field ==> Additional Boards Manager URLs
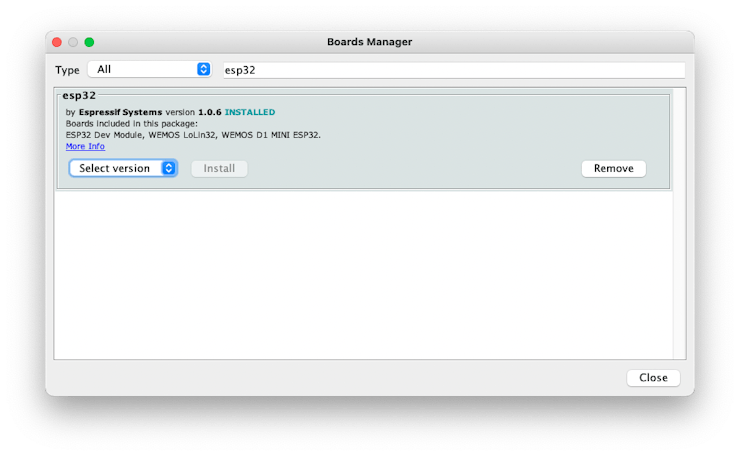
Next, open boards manager. Go to Tools > Board > Boards Manager… and enter with esp32. Select and install the most updated package
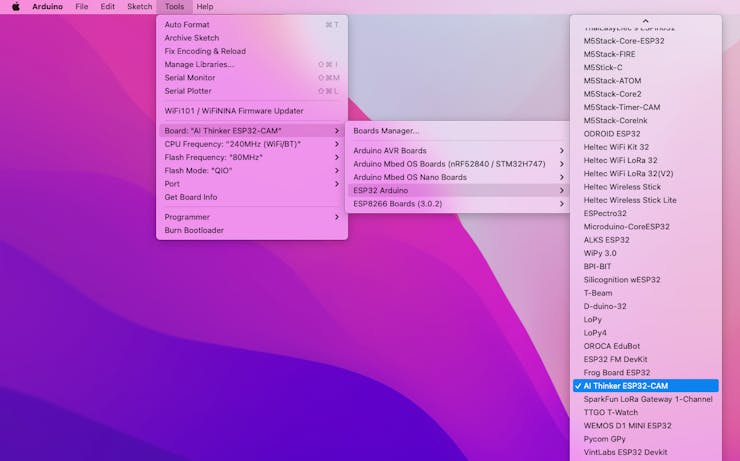
Select an ESP32 board:
- For example, AI-Thinker ESP32-CAM
Last but not least, select the Port where the ESP32-Cam is connected.
That is it! The device should be OK. Let’s do some tests.
Testing the board with BLINK
The ESP32-CAM has a built-in LED that is connected with GPIO33. So, change the Blink sketch accordantly:
#define LED_BUILT_IN 33

void setup() {
  pinMode(LED_BUILT_IN, OUTPUT); // Set the pin as output
}

// Remember that the pin work with inverted logic
// LOW to Turn on and HIGH to turn off
void loop() {
  digitalWrite(LED_BUILT_IN, LOW); //Turn on
  delay (1000); //Wait 1 sec
  digitalWrite(LED_BUILT_IN, HIGH); //Turn off
  delay (1000); //Wait 1 sec
}
Note that the LED is located under the board.
Testing WiFi
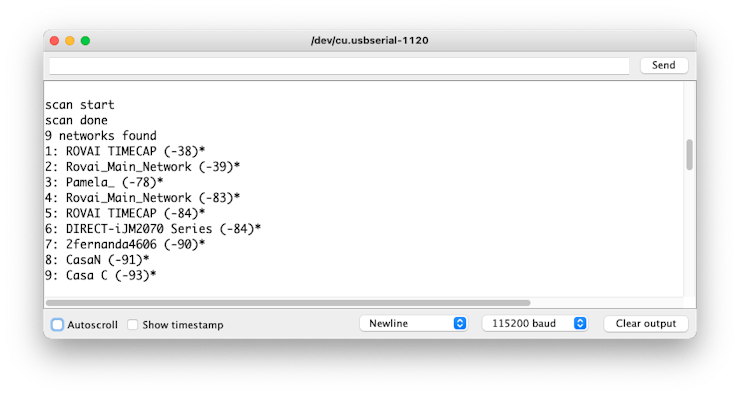
One of the sound characteristics of the ESP32S is its WiFi capability. So, let’s test its radio, scanning the wifi networks around it. You can do it, running one of the code examples included with the board.
Go to Arduino IDE Examples and look for WiFI ==> WiFIScan
On the Serial monitor, you should see the wifi networks (SSIDs and RSSIs) in the range of your device. Here is what I got in my home:
Testing the Camera
For camera test, you can use the code available on:
Examples ==> ESP32 ==> Camera ==> CameraWebServer
Only select the proper camera:
#define CAMERA_MODEL_AI_THINKER
and enter with network credentials:
const char* ssid = "*********";
const char* password = "*********";
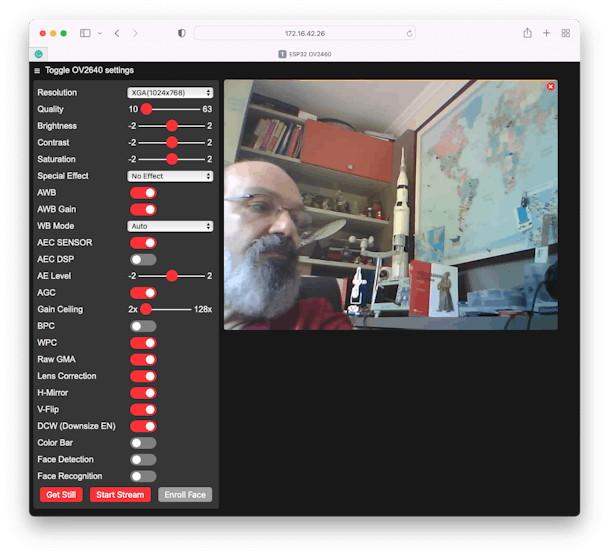
On Serial Monitor, you will get the proper address to run the server where you can control the camera:

In my case: http://172.16.42.26
Running your Web Server
So far, we could test all ESP32-Cam hardware (MCU and Camera) and also the wifi connectivity. Now, let’s run a simpler code to capture a single image and present it on a simple web page. This code was developed based on the great Rui Santos Tutorial: ESP32-CAM Take Photo and Display in Web Server
Download from GitHub the file: ESP332_CAM_HTTP_Server_STA, change the wifi credentials and run the code. Here is the result:
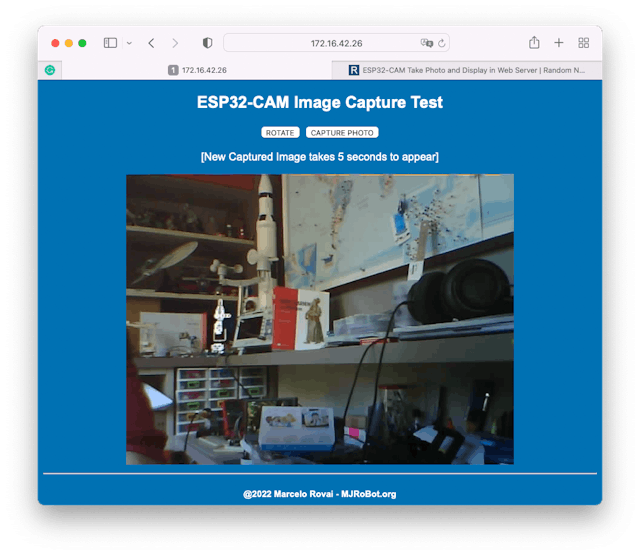
Try to inspect the code; it will be easier to understand how the camera works.
Fruits versus Veggies – Image Classification

Now that we have an embedded camera running, it is time to try image classification.
We should start training a model and proceed with inference on the ESP32-CAM. For training, we should find some data (in fact, tons of data!).
But first of all, we need a goal! What do we want to classify?
With TinyML, a set of technics associated with machine learning inference on embedded devices, we should limit the classification to three or four categories due to limitations (mainly memory in this situation). We will differentiate apples from bananas and potatoes (you can try other categories).
So, let’s find a specific dataset that includes images from those categories. Kaggle is a good start:
This dataset contains images of the following food items:
- Fruits – banana, apple, pear, grapes, orange, kiwi, watermelon, pomegranate, pineapple, mango.
- Vegetables – cucumber, carrot, capsicum, onion, potato, lemon, tomato, radish, beetroot, cabbage, lettuce, spinach, soybean, cauliflower, bell pepper, chili pepper, turnip, corn, sweetcorn, sweet potato, paprika, jalepeño, ginger, garlic, peas, eggplant.
Each category is split into the train (100 images), test (10 images), and validation (10 images).
- Download the dataset from the Kaggle website to your computer.
Training the model with Edge Impulse Studio
We will use the Edge Impulse for training, a leading development platform for machine learning on edge devices.
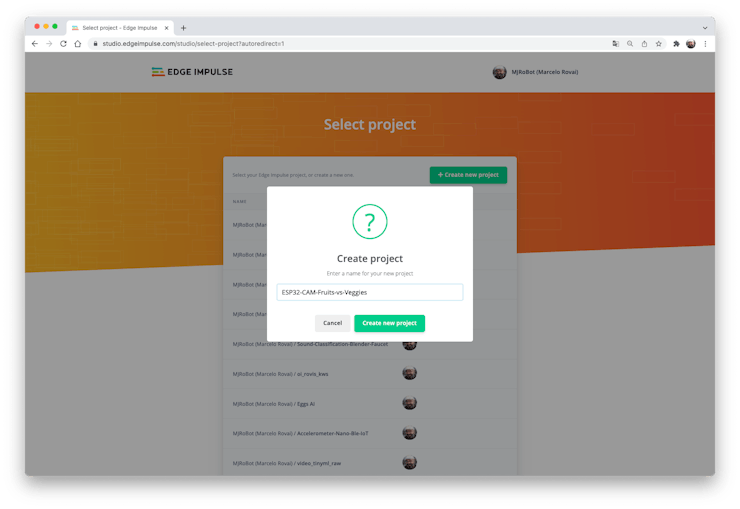
Enter your account credentials (or create a free account) at Edge Impulse. Next, create a new project:
Data Acquisition
Next, on the UPLOAD DATA section, upload from your computer the files from chosen categories:
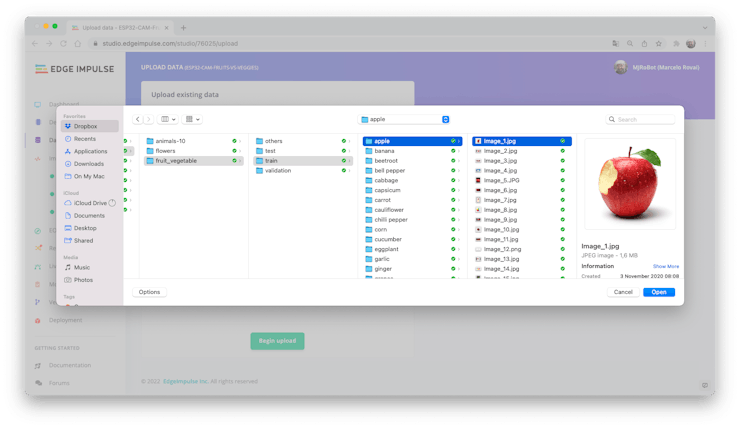
It would help if you ended with your three categories of data, reading for training
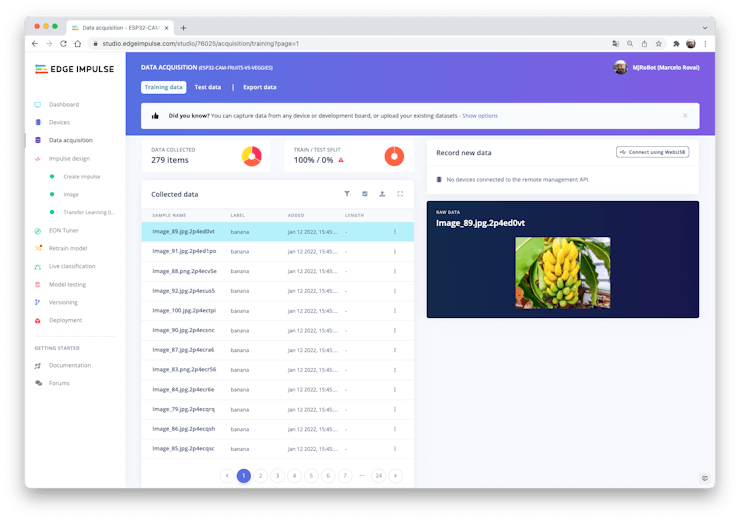
You can also upload extra data for further model testing or split the training data.
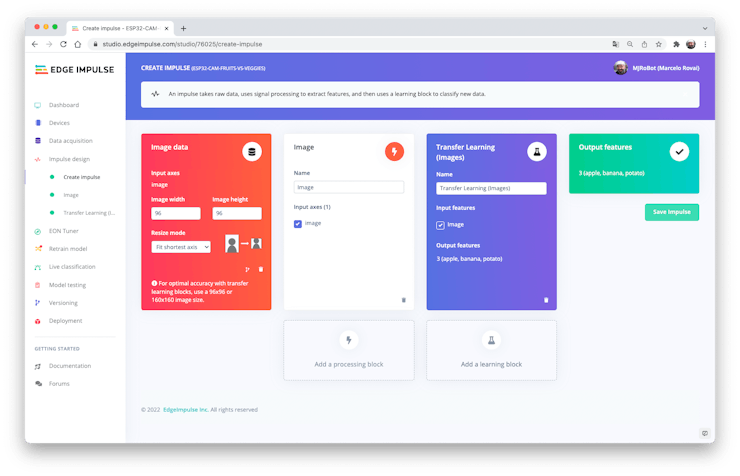
Impulse Design
An impulse takes raw data (in this case, images), extracts features (resize pictures), and then uses a learning block to classify new data.
As mentioned before, classifying images is the most common use of Deep Learning, but a lot of data should be used to accomplish this task. We have around 90 images for each category. is this number enough? Not at all! We will need thousand of images to “teach or model” to differentiate an apple from a banana. But, we can solve this issue by re-training a previously trained model with thousands of images. We called this technic, “Transfer Learning” (TL).
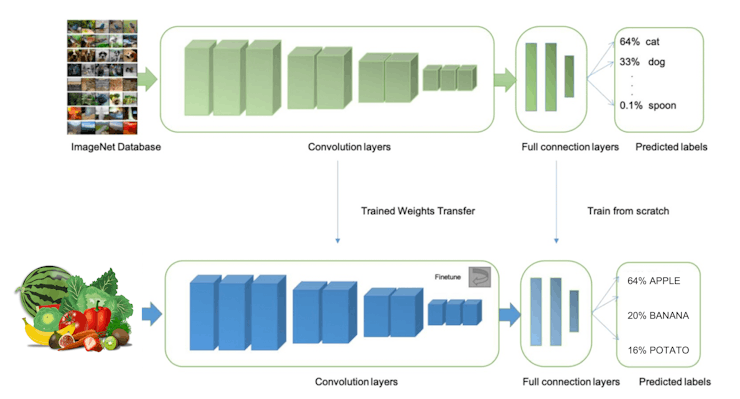
With TL, we can fine-tune a pre-trained image classification model on our data, reaching a good performance even with relatively small image datasets (our case).
So, starting from the raw images, we will resize them (96×96) pixels and so, feeding them to our Transfer Learning block:
Pre-processing (Feature generation)
Besides resizing the images, we should change them to Grayscale instead to keep the actual RGB color depth. Doing that, each one of our data samples will have dimension 9, 216 features (96x96x1). Keeping RGB, this dimension would be three times bigger. Working with Grayscale helps to reduce the amount of final memory needed for inference.
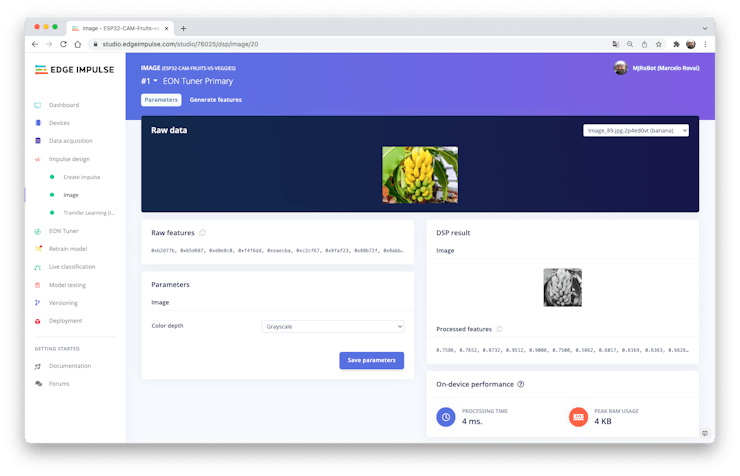
Do not forget to “Save parameters.” This will generate the features to be used in training.
Training (Transfer Learning & Data Augmentation)
In 2007, Google introduced MobileNetV1, a family of general-purpose computer vision neural networks designed with mobile devices in mind to support classification, detection, and more. MobileNets are small, low-latency, low-power models parameterized to meet the resource constraints of various use cases.
Although the base MobileNet architecture is already tiny and has low latency, many times, a specific use case or application may require the model to be smaller and faster. To construct these smaller and less computationally expensive models, MobileNet introduces a very simple parameter α (alpha) called width multiplier. The role of the width multiplier α is to thin a network uniformly at each layer.
Edge Impulse Studio has available MobileNet V1 (96×96 images) and V2 (96×96 and 160×160 images), with several different α values (from 0.05 to 1.0). For example, you will get the highest accuracy with V2, 160×160 images, and α=1.0. Of course, there is a trade-off. The highest the accuracy, the more memory (around 1.3M RAM and 2.6M ROM) will be needed to run the model and imply more latency.
At another extreme, the smaller footprint will be obtained with MobileNet V1 and α=0.10 (around 53.2K RAM and 101K ROM).
For running this project on an ESP32-CAM, we should stay at the lower side of possibilities, guarantee the case of inference, but not with high accuracy.
Another necessary technic to be used with Deep Learning is Data Augmentation. Data augmentation is a method that can help improve the accuracy of machine learning models. A data augmentation system makes small, random changes to your training data during the training process (as flipping, cropping, or rotating the images).
Under the rood, here you can see how Edge Impulse implements a data Augmentation policy on your data:
# Implements the data augmentation policy
def augment_image(image, label):
    # Flips the image randomly
    image = tf.image.random_flip_left_right(image)

    # Increase the image size, then randomly crop it down to
    # the original dimensions
    resize_factor = random.uniform(1, 1.2)
    new_height = math.floor(resize_factor * INPUT_SHAPE[0])
    new_width = math.floor(resize_factor * INPUT_SHAPE[1])
    image = tf.image.resize_with_crop_or_pad(image, new_height, new_width)
    image = tf.image.random_crop(image, size=INPUT_SHAPE)

    # Vary the brightness of the image
    image = tf.image.random_brightness(image, max_delta=0.2)

    return image, label
Being exposed to these variations during training can help prevent your model from taking shortcuts by “memorizing” superficial clues in your training data, meaning it may better reflect the deep underlying patterns in your dataset.
The final layer of our model will have 16 neurons with 10% of dropout for overfitting prevention. Here is the Training output:
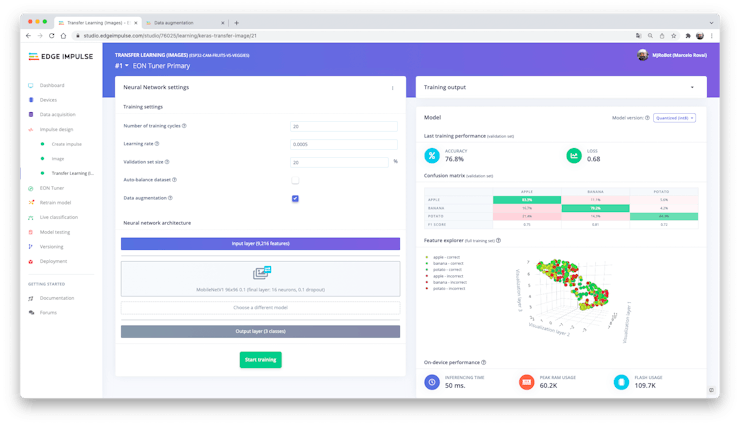
The result is not great. The model reached around 77% of accuracy, but the amount of RAM memory expected to used during the inference is quite small (around 60 KBytes), what is very good.
Deployment
The trained model will be deployed as a.zip Arduino library, to be used on a specific ESP32-Cam code.

Open your Arduino IDE and under Sketch, go to Include Library and add.ZIP Library. Select the file that you just download from Edge Impulse Studio and that’s it!
Under Examples tab on Arduino IDE, you should find a sketch code under your project name.
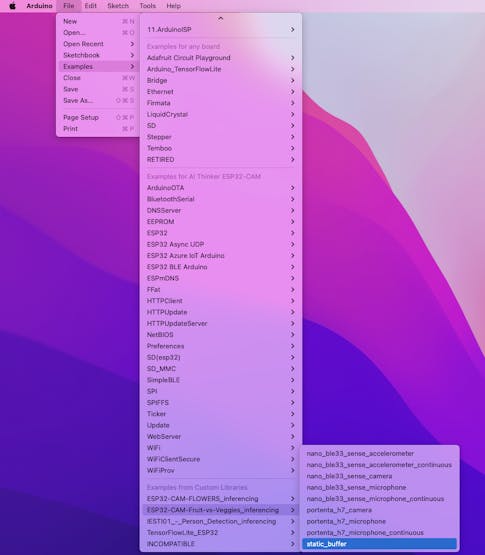
Open the Static Buffer example:

You can see that the firs lide of code is exactly the calling of a library that will have all necessary for running an inference on your device.
#include <ESP32-CAM-Fruit-vs-Veggies_inferencing.h>
Of course, this is a generic code (a “template”), that only get one sample of raw data (stored on the variable: features = {} and run the classifier, doing the inference. The resulted is shown on Serial Monitor.
What we should do is get the sample (image) from the camera, pre-process it (resizing to 96×96, converting to grayscale and flat it. This will be the input tensor of our model. The output tensor will be a vector with three values, showing the probabilities of each one of the classes.

On the website: https://github.com/edgeimpulse/example-esp32-cam, Edge impulse adapted the code available for Camera testing (Examples ==> ESP32 ==> Camera ==> CameraWebServer), including what is necessary to run the inference on ESP32-CAM. On the GitHub, download the code Basic-Image-Classification, including your project’s Library, selecting your camera and your wifi network credentials:

Upload the code to your ESP32-Cam and you should be OK to start classifying your fruits and vegetables! You can check it on Serial Monitor:

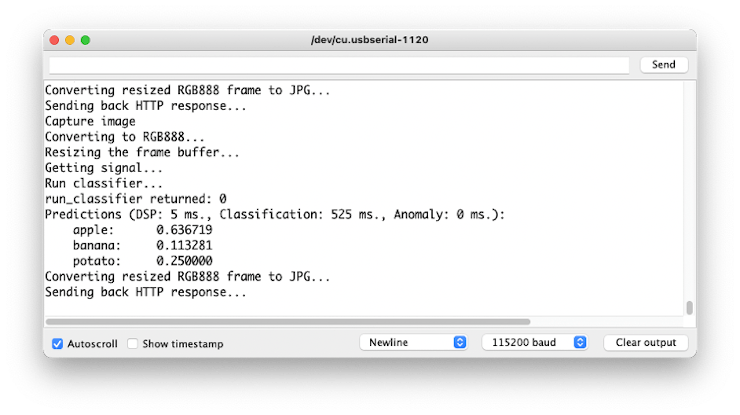
Testing the Model (Inference)

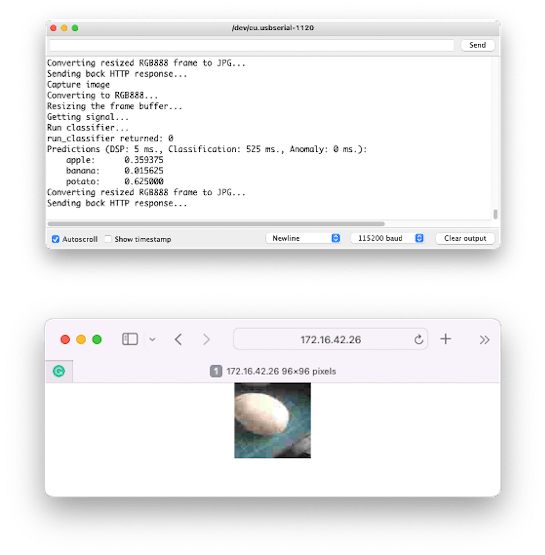
Getting a photo with the camera, the classification result will appear on the Serial Monitor:
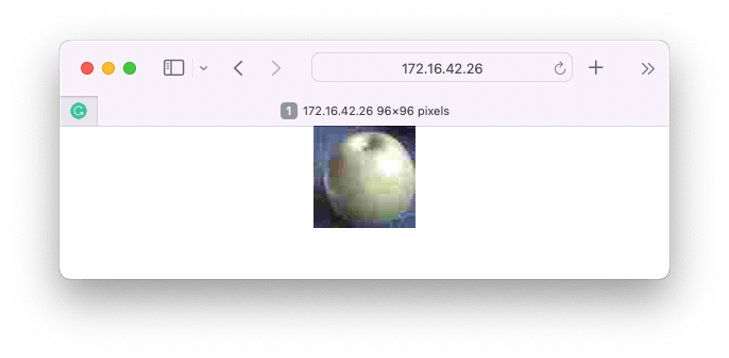
The image as, captured by the camera can be verified on a webpage:
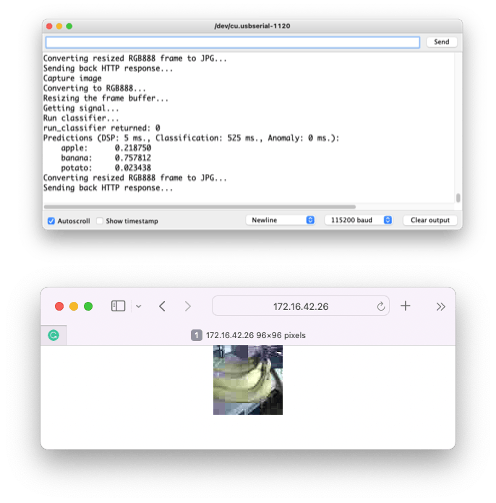
Other tests:
Conclusion
The ESP32-Cam is a very flexible, not expensive and easy to program device. The project could prove the potencial of TinyML, but I am not sure if the overall results can be applied as it on real applications (in the way that was developed). Only the smallest Transfer Learning model worked properly (MobileNet V1 with α=0.10) and, any attempt to increase accuracy using a bigger α, resulted with an Arena allocation error. Possibly, one of the reason for that, is the amount of memory already used on the final general code to run the camera. So, the next step in the project is to optimize the final code, liberating more memory to be used to run the model.
On my GitHub repository, you will find the last version of the codes: ESP32-TinyML
As always, I hope this project can help others find their way in the exciting world of AI, Electronics and IoT!
Saludos from the south of the world!
See you at my next project!
Thank you
Marcelo


Salve Marcelo! Muito obrigado pelo trabalho que vc está desenvolvendo com a ESP 32 Cam. Eu estou seguindo seus tutoriais sobre a Seeed Xiao ESP32-S3 Sense e estou aprendendo muito.
Eu achei falta de ter um retorno visual nos exemplos usando Edge Impulse. Ver as coordenadas do Bounding Boxes no monitor Serial é pouco, especialmente para detectar falsos-positivos.
Não sei se você conhece o trabalho do Simone, do site Eloquent Arduino. Ele criou uma biblioteca bem mais fácil de lidar e nos seus exemplos pagos, tem uma solução que gera um webserver streaming de vídeo com as bounding boxes e os centroides.
https://eloquentarduino.com/posts/esp32-cam-object-detection
Eu ainda estou batalhando para entender como fazer o framebuffer ser desenhado com as caixinhas, mas estou tentando um jeito de fazer isso usando aquele seu exemplo do round LCD.
Eu já dei um salve lá no fórum da Seeed sobre esse trabalho do Simone. Acho que se juntasse o que ele fez, com o que você está fazendo, e se a Seeed remunerar vcs direitinho, a gente teria um folder de exemplos excelente!
Muito obrigado, mais uma vez.
CurtirCurtir