Arquivos para 30 30UTC November 30UTC 1999

Learning Image Classification on edge devices (Android)

App Inventor: EdgeML Image Classification: Fruits vs Veggies

A few weeks ago, I wrote a tutorial exploring Image Classification, one of the most popular Machine Learning applications, deployed on a tiny device, the ESP32-CAM. It was an example of a TinyML application.

When we talk about TinyML, it immediately comes to our mind squeezed machine learning models running on embedded devices and consuming very low power. The characteristic of such applications is that we are running AI (or Machine Learning) at the Edge. But power is not always a concern, and so, we can find examples of edge machine learning applications running on more complex devices such as the Raspberry Pi (see my tutorial Exploring AI at the Edge) or even Smart Phones. In short, TinyML can be considered a subset of EdgeML applications. The below figure illustrates this statement:

hw.png

This project will explore an Edge ML application Classifying Images on an Android device.

Developing Android (AI) Apps

Nowadays, developing Android apps using Java or the Kotlin language at Android Studio is not complicated, but you need to take tutorials to gain some domain. However, if you need to develop real professional applications, Laurence Moroney teaches an excellent course, available free at Coursera: Device-based Models with TensorFlow Lite.

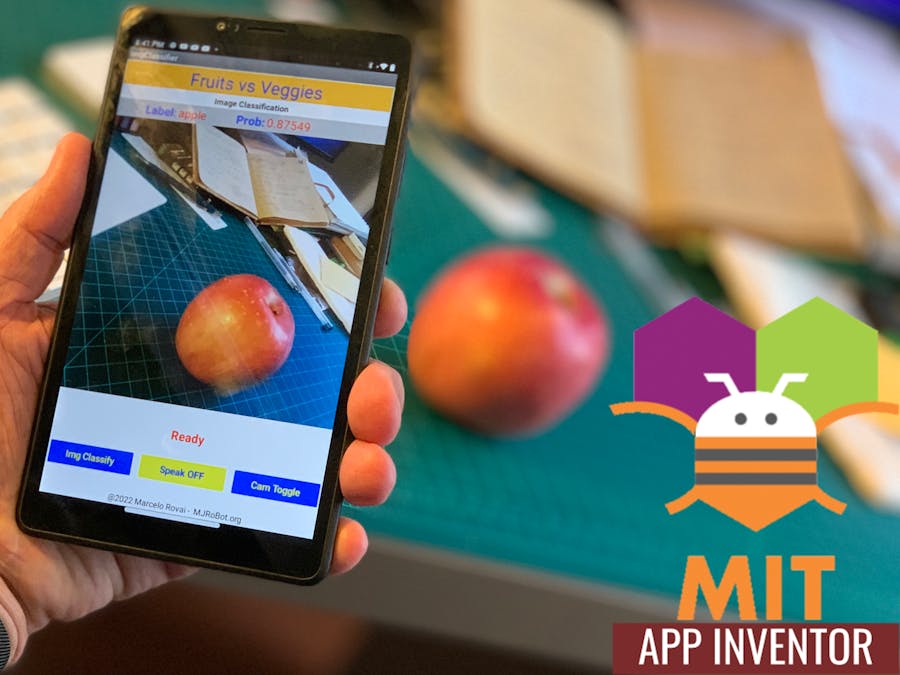
But if you are not a developer, do not have the time, or only need a more straightforward app that can be quickly deployed, the MIT App Inventor should be your choice.

MIT App Inventor is an intuitive, visual programming environment that allows everyone – even children – to build fully functional apps for Android phones, iPhones, and Android/iOS tablets.

Only basic AI Applications are available with MIT App Inventor, such as Image and Sound classification, Pose Estimation, etc.

To start, optionally on this tutorial, available at the MIT App Inventor site, you can go step by step to create a general Image Classification App that will run on your Android device. In that project, the Mobilenet model was pre-trained with the ImageNet dataset, which 999 classes can be checked here. I left the project code (.aia) and the executable (.apk) of my version of this App in my GitHub.

img__class_app.-png.png

But what we will explore here in this tutorial is how we can use our images to train a machine learning model to be deployed on an edge device, in this case, an Android tablet.

Continue lendo…

TinyML Made Easy: Gesture Recognition

10 10-03:00 fevereiro 10-03:00 2022 — Deixe um comentário

Seeed Wio Terminal programed using Codecraft/Edge Impulse is a fantastic tool for beginners to start on tinyML (Embedded Machine Learning).

TinyML

This project mixes Machine Learning (that is part of Artificial Intelligence) with a small device (Wio Terminal), which is nothing more than a microcontroller and sensors, whose main characteristics are ultra-low power consumption, 32-bit CPU, and a few kilobytes of memory. This new field of engineering is known as Embedded Machine Learning, or tinyML.

As we know, Microcontrollers (or MCUs) are very cheap electronic components, usually with just a few kilobytes of RAM, designed to use tiny amounts of energy. Nowadays, MCUs can be found embedded in almost any consumer, medical, automotive, and industrial devices. It is estimated that over 40 billion microcontrollers are sold every year, and probably hundreds of billions of them are in service nowadays. But, interestingly, those devices don’t get much attention because they’re often only used to replace functionality that older electro-mechanical systems could do in cars, washing machines, or remote controls.

More recently, with the IoT (Internet of Things) era, a significant part of those MCUs is generating “quintillions” of data, that in its majority, is not used due to the high cost and complexity (bandwidth and latency) of data transmission.

On the other side, in recent decades, we have seen a lot of development of Machine Learning models (aka Artificial Intelligence) trained with tons of data in very powerful and hungry mainframes.

But what is happening today is that suddenly, it become possible to take noisy signals like images, audio, or accelerometers and extract meaning from them by using neural networks. And what is more important is that we can run these networks on microcontrollers and sensors themselves using little power, interpreting much more of those sensor data that we are currently ignoring. This is tinyML, a new area that enables machine intelligence right next to the physical world.

The novelty area of tinyML can help bring good to our society.

The Wio Terminal

The Wio Terminal, a very affordable $36 device, is using an ATSAMD51P19 microcontroller with ARM Cortex-M4F running at 120MHz (boost up to 200MHz), 4MB of external flash memory, and 192KB of RAM. Wireless connectivity with Realtek RTL8720DN support. It is compatible with Arduino and MicroPython. It supports both Bluetooth and Wi-Fi providing a solid foundation for IoT and tinyML projects. There is a 2.4- inch LCD screen on Wio Terminal, an onboard IMU (LIS3DHTR), microphone, buzzer, microSD card slot, light sensor, and IR emitter (IR 940nm). Most importantly there are two multi-functional Grove ports onboard for the Grove ecosystem and Raspberry Pi compatible 40-pin GPIO pins for additional add-on support.

Continue lendo…

In this tutorial, we will use machine learning to build a gesture recognition system that runs on a tiny microcontroller, the RP2040.

This tutorial has 2 parts. The first one is to explore the Raspberry Pi Pico, its main components, and how to program it using Micropython and its C/C++ SDK (Software Development Kit).

Next, we will use the Pico to capture “gesture data” to be used on a TinyML model training, using Edge Impulse Studio. Once developed and tested, the model will be deployed and used for real inference on the same device.Here, a quick view of the final project:

If you are familiar with Pico’s basic programming, please feel are to jump for part 2, where the real fun will begin!

PART 1: Exploring the Raspberry Pi Pico and its SDK

The Raspberry Pi Pico

Raspberry Pi Pico is a low-cost, high-performance microcontroller board with flexible digital interfaces. Key features include:

  • RP2040 microcontroller chip designed by Raspberry Pi Foundation
  • Dual-core Arm Cortex M0+ processor, flexible clock running up to 133 MHz
  • 264KB of SRAM, and 2MB of on-board Flash memory
  • USB 1.1 with device and host support
  • Low-power sleep and dormant modes
  • 26 × multi-function GPIO pins
  • 2 × SPI, 2 × I2C, 2 × UART, 3 × 12-bit ADC, 16 × controllable PWM channels
  • Accurate clock and timer on-chip
  • Temperature sensor
  • Accelerated floating-point libraries on-chip
  • 8 × Programmable I/O (PIO) state machines for custom peripheral support
Pico-R3-SDK11-Pinout.png

An interesting characteristic is its ability to drag-and-drop programming using mass storage over USB.

Spite that it is straightforward to “upload” a program to the Pico; what is missing is a reset push-button to prevent USB disconnection every time a new code is uploaded, which can damage the Pico USB connector. Fortunately, pin 30 (RUN) is available and can be used for this function. Just use a push-button (normally-open), connecting this pin to the ground. Now, anytime that a program should be uploaded to Pico press both buttons at the same time.

Buttons.png

In this documentation link, is possible to find detailed information about the MCU RP 2040, the heart of Pico.

Continue lendo…