

Emulating a Google Assistant on a RaspberryPi and Arduino Nano 33 BLE
In my article Home Automation with Alexa, we learned how to emulate IoT devices and control them remotely using a Voice Assistant device. There, we used an Echo-Dot that “wake-up” every time that the word Alexa is spotted.
But, how a voice assistant works?
We will try to answer it on this project, emulating a Google assistant using a RaspberryPi and an Arduino Nano.
Introduction
For starting, it is essential to realize that Voice Assistants on the market, like Google Home or Amazon Echo-Dot, only react to humans when they are “waked-up” by particular keywords as “ Hey Google” on the first one and “Alexa” on the second.
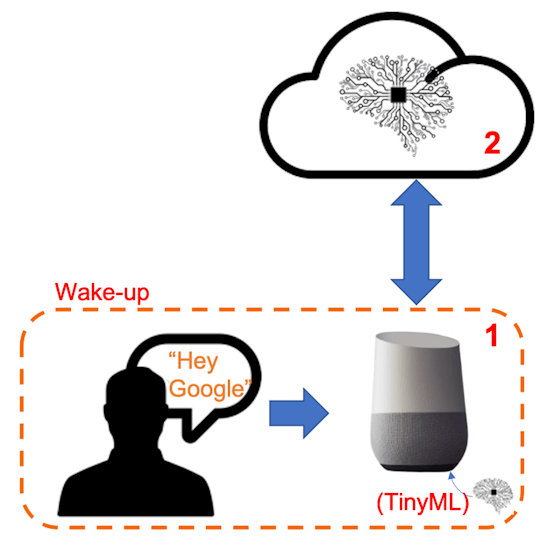
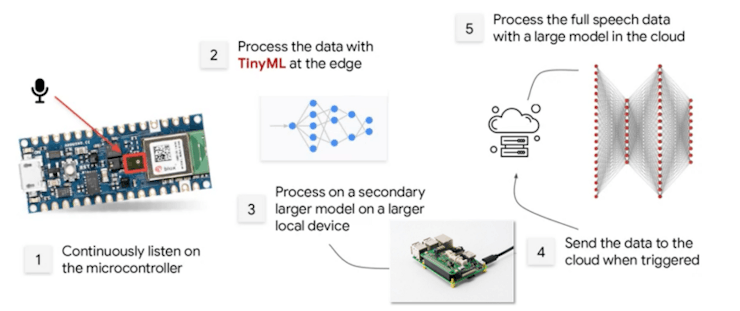
In other words, the full process to recognize voice commands is based on a multi-stage model or Cascade Detection.
Stage 1: A smaller microprocessor inside the Echo-Dot or Google Home continuously listens to the sound, waiting for the keyword to be spotted. For such detection, a TinyML model at the edge is used.
Stage 2: Only when trigged, the data is sent to the cloud and so processed on a larger model.
TinyMLis an excellent concept that enables machine intelligence right next to the physical world; besides, running machine learning models (ML) at the microprocessor level avoid issues as Latency, Power Consuming, and Security.
For stage 1 ( KWS or Keyword Spotting) in this project, we will use an Arduino Nano 33 BLE Sense microcontroller. Among several incorporated sensors, it has a digital microphone that will be used to spot the keyword. And for stage 2, the RaspberryPi will be used to contact the Google Services on the Cloud to perform a more complex task once triggered by the Arduino.
The project will be split into two parts:
Part 1: Emulating the Google Assistant on an RPi
Part 2: Implementing a KWS on the Arduino Nano
Here you can have an idea about the final project:
Part 1 — Emulating the Google Assistant on an RPi
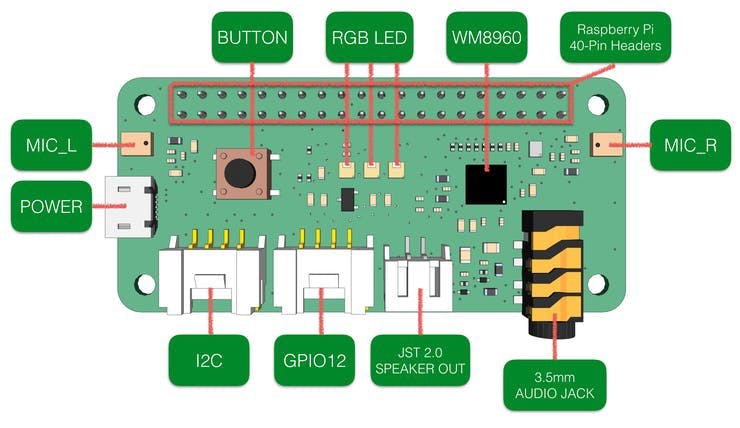
Besides the software that will be developed to allow the RPi to emulate a Google Assistant, some additional HW will also be necessary. You can install an external Microphone and loudspeaker or use a HAT for simplicity. In this project, we will use a Hat, the ReSpeaker 2-Mics Pi HAT.
ReSpeaker 2-Mics Pi HAT
Here a diagram of the Hat.
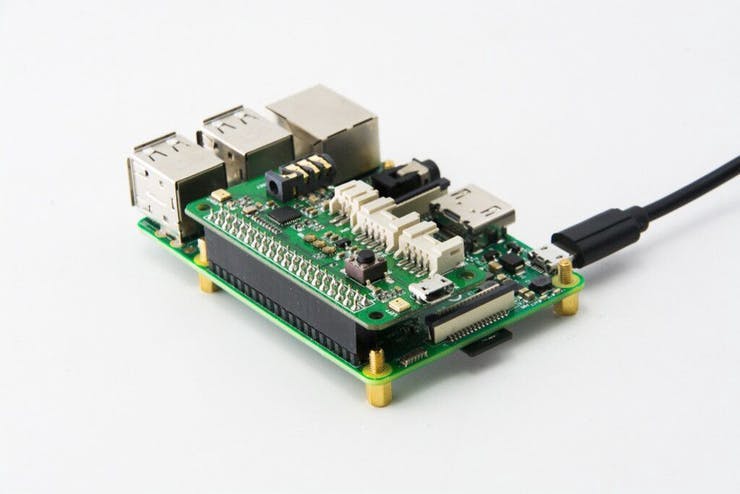
Its installation is very simple:Connect ReSpeaker 2-Mics Pi HAT to Raspberry Pi
Setup the driver on Raspberry Pi
sudo apt-get update
sudo apt-get upgrade
git clone https://github.com/respeaker/seeed-voicecard.git
cd seeed-voicecard
sudo ./install.sh
reboot
Check the sound cards installed on the RPi
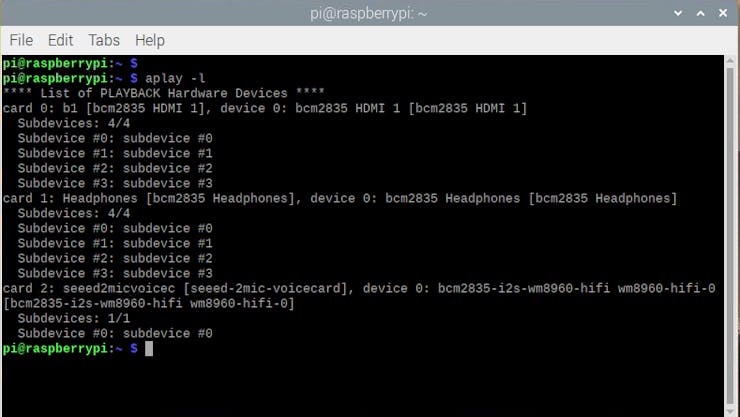
So, in my case, the sound cards are:
- Card 0: RPi HDMI
- Card 1: RPi Headphone audio jack
- Card 2: ReSpeaker 2-Mics Pi HAT
Card 2 should be the default, and you can verify it here on Pi Preferences/Audio Device Settings:
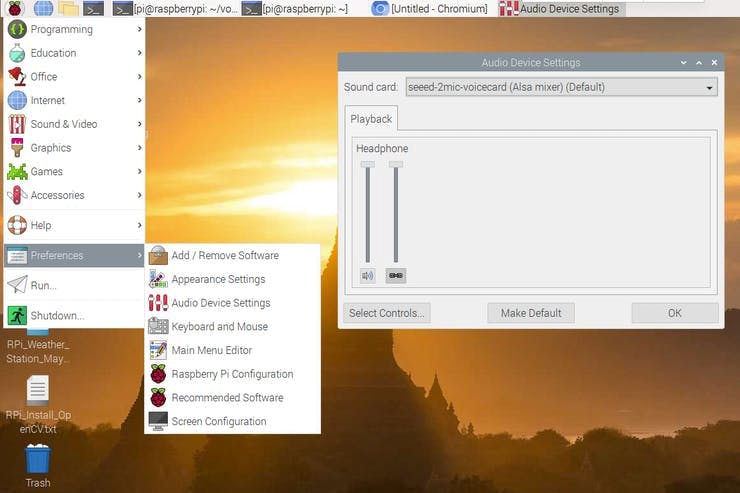
In my case, having the output on ReSpeaker 2-Mics Pi HAT (Audio Jack) did not work correctly, so I defined Card 2 as input (Mics on ReSpeaker), having as output the standard Rpi Audio Jack (Card 1).
This configuration is done by editing the.asoundrc file in the /home/pi folder. To edit this file, execute the following terminal command:
sudo nano /home/pi/.asoundrcand changing pcm.output from card 2 to card 1:
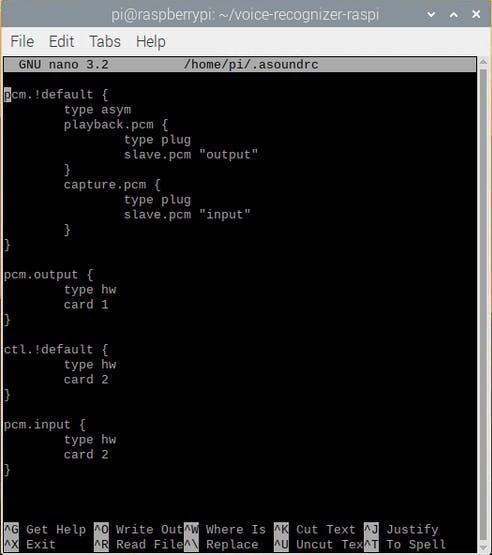
Anytime that Pi Preferences/Audio Device Settings are changed, the above file must be checked. Also, the output volume can be changed at the same menu for Sound Card 1 — Headphones (RPi Audio Jack).At this point, it is possible to make some tests:
Testing Audio Output:
speaker-test -t wav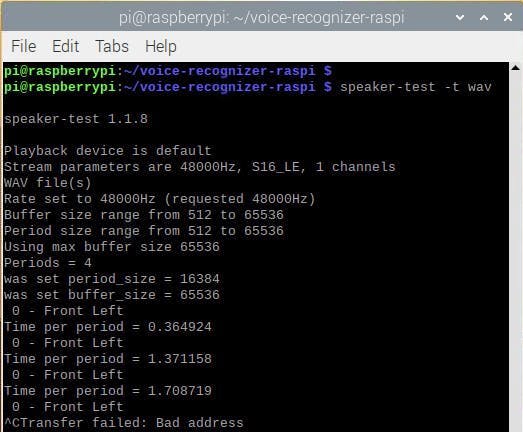
You should listen “Front” and “Left” be repeated on the loudspeaker. Press [CTRL]+[C] to exit.
Testing Audio Input:
First, install the Python Library pyaudio, used to play and record audio on the RPi:
sudo pip install pyaudioIn the puAudio webPage, http://people.csail.mit.edu/hubert/pyaudio/, you can find info and examples of how to use the library.Using the below script, record a few seconds (5s) of audio:
import pyaudio
import wave
RESPEAKER_INDEX = 2 # refer to input device id (card 2)
RESPEAKER_RATE = 16000
RESPEAKER_CHANNELS = 2
RESPEAKER_WIDTH = 2
CHUNK = 1024
RECORD_SECONDS = 5
WAVE_OUTPUT_FILENAME = "record_test.wav"
p = pyaudio.PyAudio()
stream = p.open(
    rate=RESPEAKER_RATE,
    format=p.get_format_from_width(RESPEAKER_WIDTH),
    channels=RESPEAKER_CHANNELS,
    input=True,
    input_device_index=RESPEAKER_INDEX,)
print("* recording")
frames = []
for i in range(0, int(RESPEAKER_RATE / CHUNK * RECORD_SECONDS)):
    data = stream.read(CHUNK)
    frames.append(data)
print("* done recording")
stream.stop_stream()
stream.close()
p.terminate()
wf = wave.open(WAVE_OUTPUT_FILENAME, 'wb')
wf.setnchannels(RESPEAKER_CHANNELS)
wf.setsampwidth(p.get_sample_size(p.get_format_from_width(RESPEAKER_WIDTH)))
wf.setframerate(RESPEAKER_RATE)
wf.writeframes(b''.join(frames))
wf.close()
A file named “record_test.wav” should appear in the folder where the script was executed.To verify the audio recorded, execute the below script:
import pyaudio
import wave
CHUNK = 1024
WAVE_INPUT_FILENAME = "record_test.wav"
print("Playing a wave file: {}".format(WAVE_INPUT_FILENAME))
wf = wave.open(WAVE_INPUT_FILENAME, 'rb')
p = pyaudio.PyAudio()
stream = p.open(format=p.get_format_from_width(wf.getsampwidth()),
    channels=wf.getnchannels(),
    rate=wf.getframerate(),
    output=True)
data = wf.readframes(CHUNK)
while data != b'':
    stream.write(data)
    data = wf.readframes(CHUNK)
stream.stop_stream()
stream.close()
p.terminate()
If you listen to what you record, great! We are on business!Before starting preparing our RPi to emulate the Google Assistant, let’s explore the Button and RGB LEDs that are installed on the ReSpeaker 2-Mics Pi HAT:
The Button
There is an on-board User Button connected to GPIO17, as shown in the below electrical diagram.

Now we will try to detect it with python and RPi.GPIO.
First, install the RPi.GPIO library
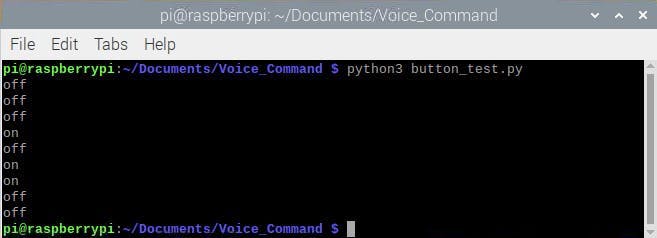
sudo pip install rpi.gpioNext, you can execute the below script to test the button:
import RPi.GPIO as GPIO
import time
BUTTON = 17
GPIO.setmode(GPIO.BCM)
GPIO.setup(BUTTON, GPIO.IN)
while True:
    try:
        state = GPIO.input(BUTTON)
        if state:
            print("off")
        else:
            print("on")
        time.sleep(1)
    except KeyboardInterrupt:
        break
On terminal, you will verify when the button is pressed.
The on-board RGB LEDs (APA102)

Each one of the three on-board APA102 RGB LEDs has an additional driver chip. The driver chip takes care of receiving the desired color via its input lines and then holding it until a new command is received.Install the spidev library:
sudo pip install spidevAnd clone the below file:
git clone https://github.com/respeaker/mic_hat.gitOn mic_hat subfolder, execute the script pixels.py, that will perform a test on all LEDs. Use [CTRL]+[C] to stop the LEDs
python3 pixels.pyThe class pixels, has several prepared functions as:
- pixels.wakeup(): Turn ON all LEDS
- pixels.off(): Turn OFF all LEDs
- pixels.think(): Turn ON LEDs one by one, shifting colors
- pixels.speak(): Turn ON all LEDs, changing its light intencity
To efficiently use the function on a final code, have both files apa102.py and pixels.py in the same directory. With that, you can use a simple code like the one below to access the LEDs:
from pixels import Pixels
pixels = Pixels()
pixels.wakeup()
pixels.off()
pixels.think()
pixels.off()
pixels.speak()
pixels.off()
Google Voice Services
At this point all HW is working properly:
- Audio Input
- Audio Output
- Button
- LEDs
It is time to install the Google Voice Services on our RaspberryPi. For that, we will take advice from the excellent tutorial, http://www.makerspace-uk.co.uk/respeaker-2-mics-pi-hat/.
Install Google Assistant API
Go to the Rpi home directory and clone the VoiceKit GitHub on the subdirectory /voice-recognizer-raspi
cd ~
git clone -b voicekit https://github.com/google/aiyprojects-raspbian.git ~/voice-recognizer-raspi
Go to this created subdirectory and run the script to install the files:
cd ~/voice-recognizer-raspi
scripts/install-deps.sh
To use the Google Voicekit, it necessary to have picotts, a text-to-speech platform that uses an offline pico Text-to-Speech engine to read a text with natural sounding voices. To install the pico TTS library on the system, typically on Debian, do:
sudo apt-get install libttspico-utilsOn some Raspbian release, this package is missing, but you can copy the arm deb package from Debian. On Debian Buster, for example, the package is missing, so use the following commands to install it:
wget http://ftp.us.debian.org/debian/pool/non-free/s/svox/libttspico0_1.0+git20130326-9_armhf.deb

wget http://ftp.us.debian.org/debian/pool/non-free/s/svox/libttspico-utils_1.0+git20130326-9_armhf.deb

sudo apt-get install -f ./libttspico0_1.0+git20130326-9_armhf.deb ./libttspico-utils_1.0+git20130326-9_armhf.deb
Install gRPC (Remote Procedure Calls)
Why would I want to use gRPC?
The main usage scenarios:
- Low latency, highly scalable, distributed systems.
- Developing mobile clients which are communicating to a cloud server.
- Designing a new protocol that needs to be accurate, efficient and language independent.
- Layered design to enable extension eg. authentication, load balancing, logging and monitoring etc.
sudo pip install grpcio
sudo pip install grpcio-tools
Now, It is time to install Google API and Google Assistant Library:
sudo pip install --upgrade google-api-python-client
sudo pip install --upgrade google-assistant-library==1.0.1
sudo pip install --upgrade google-assistant-sdk[samples]==0.5.1
At this point, the major packages are installed, reboot the system:
rebootChanges required on original Google-Voice-Kit:
Open the file:
/home/pi/voice-recognizer-raspi/src/aiy/_apis/_speech.pyand comment the following lines:
#try:
# from google.cloud import speech
# from google.cloud.speech import enums
# from google.cloud.speech import types
#except ImportError:
# print("Failed to import google.cloud.speech. Try:")
# print(" env/bin/pip install -r requirements.txt")
# sys.exit(1)
Now, open the file:
/home/pi/voice-recognizer-raspi/src/aiy/voicehat.pyAnd change the button GPIO (that should appear as 23) for the one used on ReSpeaker 2-Mics Pi HAT (that should be 17)
_GPIO_BUTTON = 17
At this point, all HW and SW should be complete. The missing part is to get the credentials from Google to run the Voice Kit on our Raspberry.
Enabling Google Assistant API
All the steps for enabling the API can be found at the Google AIY Voice Kit website, under the ‘GET CREDENTIALS’ section.
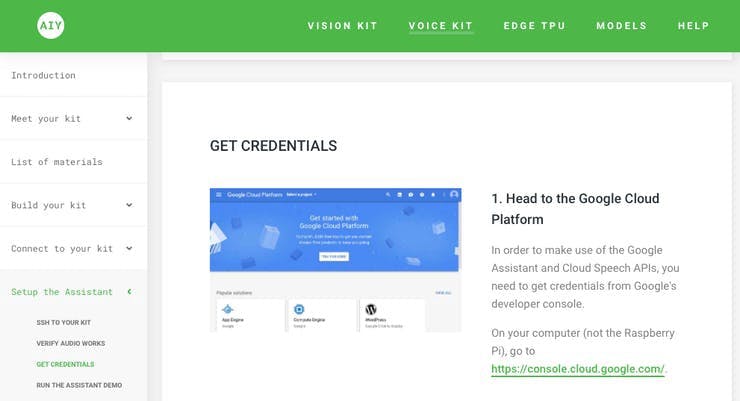
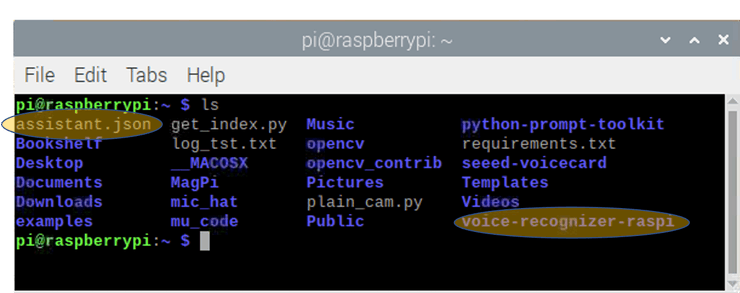
This section is located far down on that page (around half of a long website). You should open a second-page https://console.cloud.google.com/ (The Google Cloud Platform) and following the instructions on the first page. If everything is correct, you should have a JSON file downloaded on your computer. The instructions also explain how to create a file assistant.json, where the content of such downloaded file must be saved. The file must be saved on your RPi home directory:
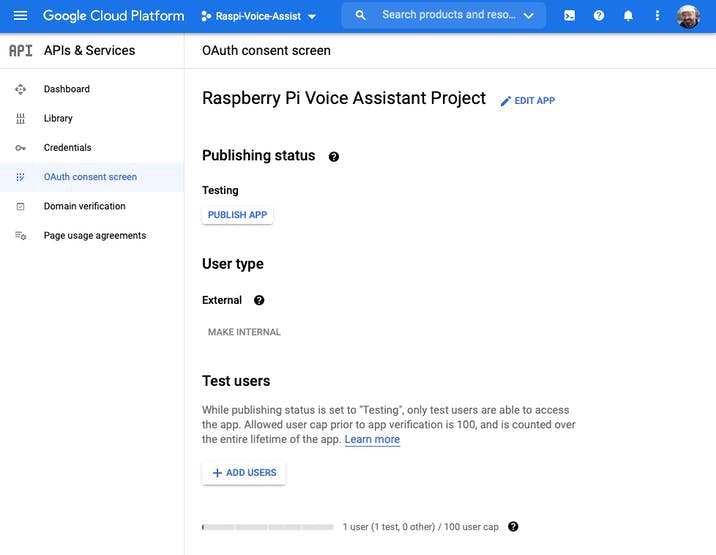
Additionally to the above instructions, I also included my e-mail as a “Test users”, using the + ADD USERS options on OAuth consent screen page:
And that is it! It is time to test our Voice Assistant!
Testing the Voice Assistant
Go to subfolder where the Voice-Kit was installed:
cd ~/voice-recognizer-raspiAnd run the demo program that is located on /src subfolder:
python3 src/assistant_grpc_demo.pyIf everything is OK, you should get the following messages on Terminal:
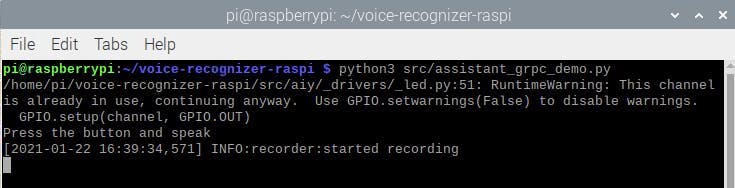
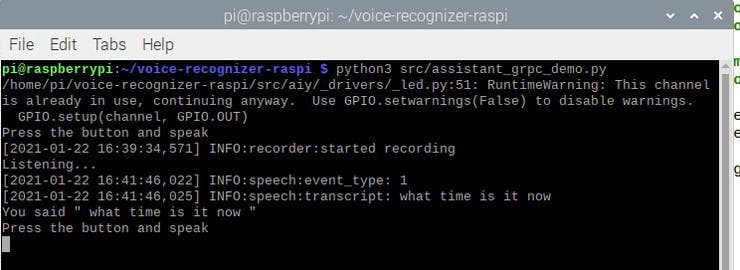
The Voice Assistant is waiting that you press the button to start a conversation:For example, I pressed the button, and the message “Listening…” appeared. I asked, “What time is it now?” that also appeared on the Terminal. At the same time, the assistant will speak the answer.
The below video better illustrate a real conversation:
As a last part of the project, let’s Include the LEDs available on the hat on the above code, as shown below:
Copy both files apa102.py and pixels.py at the same directory, where you run the below code (in this case: ”voice-recognizer-raspi/src”
import time
import aiy.assistant.grpc
import aiy.audio
import aiy.voicehat
from pixels import Pixels
import logging
pixels = Pixels()
pixels.off()
logging.basicConfig(
    level=logging.INFO,
    format="[%(asctime)s] %(levelname)s:%(name)s:%(message)s"
)
def wakeup_assistant():
    pixels.wakeup()
    pixels.think()
    time.sleep(3)
    pixels.speak()
    time.sleep(3)
    pixels.off()
def main():
    wakeup_assistant()
    status_ui = aiy.voicehat.get_status_ui()
    status_ui.status('starting')
    assistant = aiy.assistant.grpc.get_assistant()
    button = aiy.voicehat.get_button()
with aiy.audio.get_recorder():
        while True:
            pixels.off()
            status_ui.status('ready')
            print('Press the button and speak')
            button.wait_for_press()
            status_ui.status('listening')
            print('Listening...')
            pixels.think()
            text, audio = assistant.recognize()
            if text:
                if text == 'goodbye':
                    status_ui.status('stopping')
                    print('Bye!')
                    pixels.off()
                    time.sleep(1)
                    break
                print('You said "', text, '"')
            if audio:
                pixels.speak()
                aiy.audio.play_audio(audio)
                pixels.off()
    pixels.off()
if __name__ == '__main__':
main()
Now, a kind of “Wake-up LED show” will be added (once) during the start up process. Also every time that that the button is pressed, the Voice Assistant will “Think” waiting for our question, for that we will use the pixels.think() function that force the LEDs to scroll. Same when the Assistant is “talking”, where the LEDs will keep their RGB color, but will “fade”.
Note that if you say “Goodbye”, the assistant will be closed.
Playing with GPIOs
A significant advantage of emulating the Google Assistant on an RPi is that we can use its GPIOs to control external things in the real world. We already did this using the ReSpeaker 2-Mics Pi HAT internal LEDs and button. The HAT leaves available 2 GPIOs (12 and 13) through the Grove connector, as shown in its electrical diagram:

Let’s now install an external button on RPI GPIO 13 and an LED on GPIO 12, as shown in the below diagram:
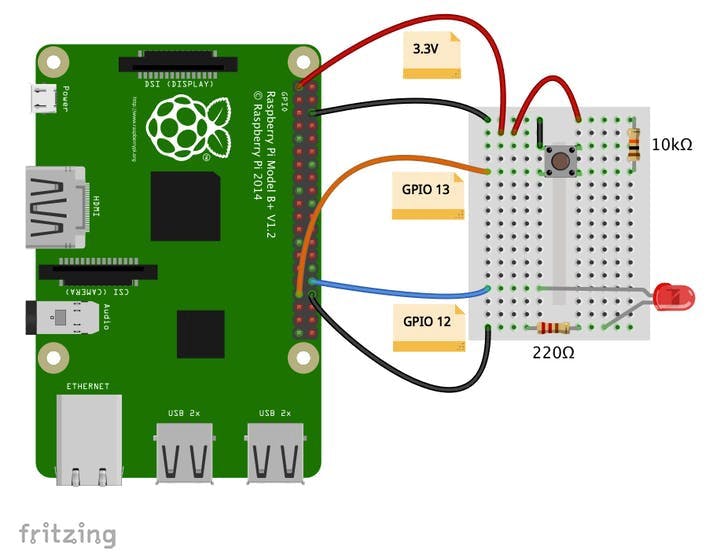
Let’s change the script used before to test the HAT button to now, test the external button and the LED. The LED will be ON every time that the button is pressed:
import RPi.GPIO as GPIO
import time
BUTTON = 13
LED = 12
GPIO.setmode(GPIO.BCM)
GPIO.setup(BUTTON, GPIO.IN)
GPIO.setup(LED, GPIO.OUT)
GPIO.output(LED, GPIO.LOW)
while True:
    try:
        state = GPIO.input(BUTTON)
        if state:
            GPIO.output(LED,GPIO.LOW)
            print("off")
        else:
            GPIO.output(LED,GPIO.HIGH)
            print("on")
        time.sleep(1)
    except KeyboardInterrupt:
        GPIO.cleanup()
        break
print("clean up")
GPIO.cleanup() # cleanup all GPIO
The video shows the result:
Waking up the Voice Assistant using External button
The only thing needed is to change the Assistant’s Button GPIO. Open the file:
/home/pi/voice-recognizer-raspi/src/aiy/voicehat.pyAnd change the button GPIO (that should appear as 17) for the one used by our external button (13)
_GPIO_BUTTON = 13
And from now, any time that the external button is pressed, the Voice Assistant “wake-up”.
Controling an external device with voice:
Let’s also change the full code used before, to also incorporate the LED, that should receive some voice controls as:
- Turn ON
- Turn OFF
- Blink
Here the complete code:
import time
import aiy.assistant.grpc
import aiy.audio
import aiy.voicehat
from pixels import Pixels
import logging
import RPi.GPIO as GPIO
LED = 12
GPIO.setmode(GPIO.BCM)
GPIO.setup(LED, GPIO.OUT)
GPIO.output(LED, GPIO.LOW)
pixels = Pixels()
pixels.off()
logging.basicConfig(
    level=logging.INFO,
    format="[%(asctime)s] %(levelname)s:%(name)s:%(message)s"
)
def led_blink():
    for i in range (0,6):
    GPIO.output(LED,GPIO.HIGH)
    time.sleep(0.25)
    GPIO.output(LED,GPIO.LOW)
    time.sleep(0.25)
def wakeup_assistant():
    pixels.wakeup()
    pixels.think()
    time.sleep(3)
    pixels.speak()
    time.sleep(3)
    pixels.off()
def main():
    wakeup_assistant()
    status_ui = aiy.voicehat.get_status_ui()
    status_ui.status('starting')
    assistant = aiy.assistant.grpc.get_assistant()
    button = aiy.voicehat.get_button()
with aiy.audio.get_recorder():
        while True:
            play_audio = True
            pixels.off()
            status_ui.status('ready')
            print('Press the button and speak')
            button.wait_for_press()
            status_ui.status('listening')
            print('Listening...')
            pixels.think()
            text, audio = assistant.recognize()
if text:
                if text == 'goodbye':
                    status_ui.status('stopping')
                    print('Bye!')
                    pixels.off()
                    time.sleep(1)
                    break
                if 'turn on' in text:
                    pixels.off()
                    GPIO.output(LED,GPIO.HIGH)
                    play_audio = False
                if 'turn off' in text:
                    pixels.off()
                    GPIO.output(LED,GPIO.LOW)
                    play_audio = False
                if 'blink' in text:
                    pixels.off()
                    led_blink()
                    play_audio = False
                print('You said "', text, '"')
if play_audio:
                if audio:
                    pixels.speak()
                    aiy.audio.play_audio(audio)
                    pixels.off()
    pixels.off()
if __name__ == '__main__':
main()
The result is here:
Part 2 Using Keyword Spotting (KWS)
So far on our Voice Assistant, the way used to wake it was using a physical button, but as discussed at introduction, Voice Assistants, like Google Home, should react when particular keywords are used as “ Hey Google”.
This project will replace the physical button with a “virtual one”, using a mechanism known as KWS, or Keyword Spotting. We will use an Arduino Nano 33 BLE Sense that is a microcontroller that has incorporated a digital microphone that will be used to spot the keyword.
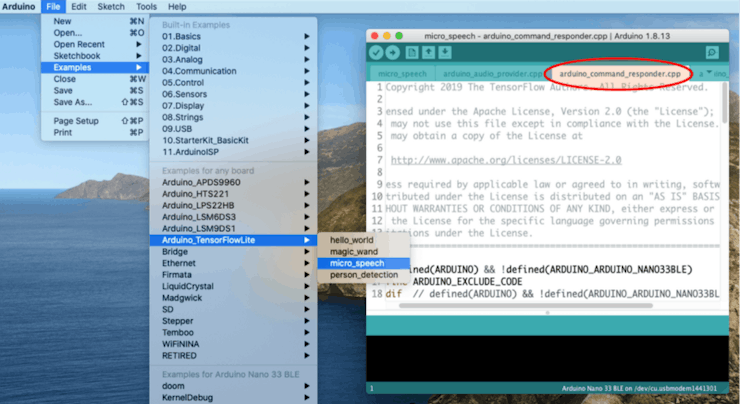
For simplification (once the main object of this project is not the development of Neural Network Models), let’s re-use a code developed by Google incorporated on the Arduino IDE, created using TensorFlowLite and named “micro_speech”. This sketch incorporates a model that can spot two words: YES, NO, besides UNKNOW and Silence. You can get it from the examples Tab as shown below:
For testing, you can upload the code as it into your Arduino Nano and tested it by saying words like “YES”, or “No”. When spotted, the internal RGB LED should light (YES: Green and NO: RED).
Quick Review how Speech Recognition works on a microprocessor
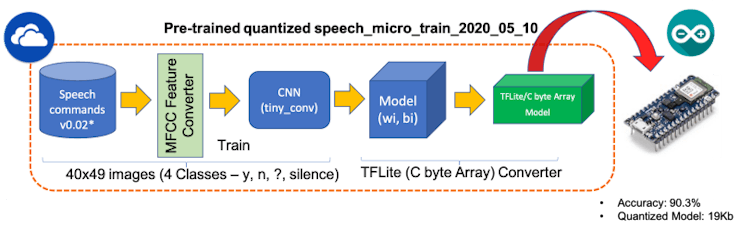
The Arduino will perform inference in a pre-trained model developed using TensorFlow. A Convolutional Neural Network Model (tiny_conv) is trained with +100, 000 one second (or less) record samples (.wave format) of 35 different phonemes (Google Speech Commands Dataset). The trained model is converted to a C byte Array by TensorFlowLite, to be used on a small microprocessor as the Nano (the final model has more than 90% accuracy and only 19K bytes in size).
Observe that the raw data (sound in.wave format) can not be used directly with a CNN model. First, the sound data should be converted to an image (40×49 pixels), which is done using an MFCC Feature Converter, as shown below:
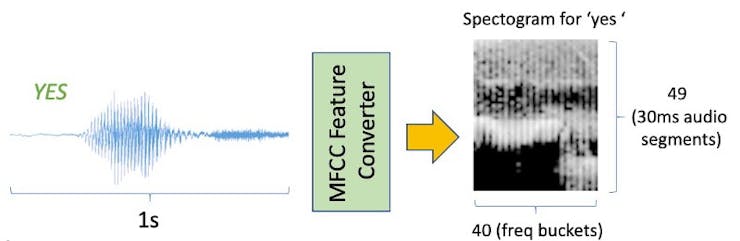
Mel-frequency cepstral coefficients (MFCCs) are coefficients that collectively make up an MFC, that is the is a representation of the short-term power spectrum of a sound, based on a linear cosine transform of a log power spectrum on a nonlinear mel scale of frequency.
Let’s see how the code works in general terms:
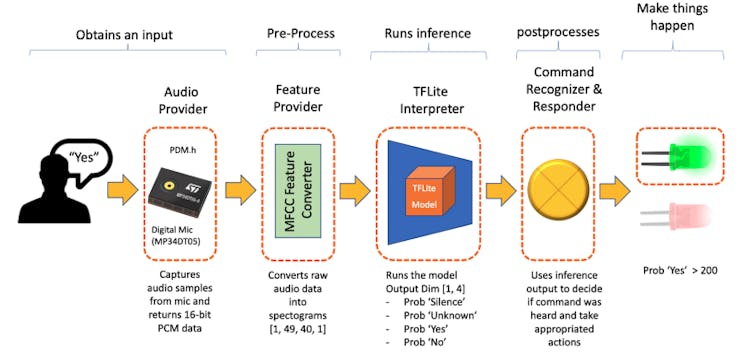
1. The Arduino should be continuously listening to the sound around it. The Microphone captures audio samples (1 second), converting them to 16-bit data (Pulse Coded Modulation — PCM). The Audio Provider module does this task.
2. The PCM data should be pre-processed before use as inference. On the module Feature Provider, the raw data are converted into images by the MFCC Feature Converter. Each sample will be a monochromatic image (or a Tensor of size: [1, 49, 40, 1])
3. The TFLite Interpreter runs the inference, or better, classifies the input tensor into four distinct classes. The output will be a tensor with dimension [1, 4], where the values are the probabilities of the input sound be Silence, Unknot, Yes, or No.
4. Based on those probabilities, the module Command Recognizer & Responder will use the TFLite interpreter output to decide if a command was heard and take the appropriate actions. For example, if the sound has a higher probability of being a ‘YES’, the internal Green RGB LED will be turned ON, if it is ‘NO’, the Red one, and finally, for any other possible word, the blue. The model is quantized to work with 8 bits integer, so the probability goes from 0 to 255. If the probability is greater than 200 (around 80%), the command is executed.
The below diagram resumes the process:
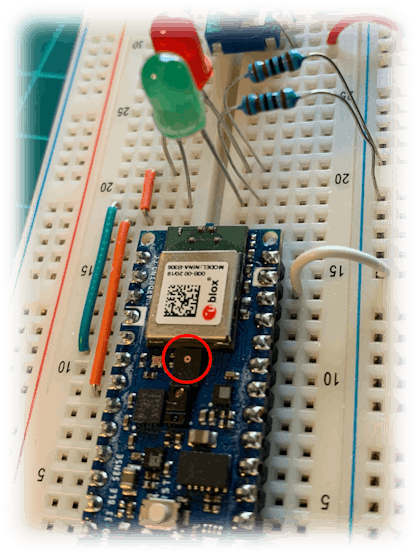
Modifying the HW
We will install two external LEDs replicating what is done with the Nano internal RGB LED. The Green LED will be connected to Nano Output D2 and the Red one to D4. The Nano output D3 (together with GND) will replace the external physical button connected to RPi GPIO13.

Modifying the Code
We must modify the code so that each time the word YES (our Wake-up word) is spotted, the external Green LED is ON, and a pulse is sent to RPi, simulating a button pressed.
As you could see, the only module that should be changed is the Command Recognizer & Responder; that will make things happen! This code is on the Tab: arduino_command_responder.cpp (this Tab is highlighted on the Arduino IDE image shown before).
Below, new parts of code that should be added to arduino_command_responder.cpp:
...
#define GREEN_LED_PIN 2
#define SIM_BUT_PIN 3
#define RED_LED_PIN 4
// Create a function to simulate a button pressed for 500ms
void buttonSimulator(){
  pinMode(SIM_BUT_PIN, OUTPUT);
  digitalWrite(SIM_BUT_PIN, LOW);
  delay(500);
  pinMode(SIM_BUT_PIN, INPUT);
}
...
pinMode(GREEN_LED_PIN, OUTPUT);
pinMode(RED_LED_PIN, OUTPUT);
pinMode(SIM_BUT_PIN, INPUT); // Open state
...
// If we hear a command, light up the appropriate LEDs and send signal to RPi
    if (found_command[0] == 'y') {
      last_command_time = current_time;
      digitalWrite(LEDG, LOW);  // Green for yes
      digitalWrite(GREEN_LED_PIN, HIGH);  // HIGH for yes
      buttonSimulator(); // Simulate button
    }
if (found_command[0] == 'n') {
      last_command_time = current_time;
      digitalWrite(LEDR, LOW);  // Red for no
      digitalWrite(RED_LED_PIN, HIGH);  // HIGH for yes
    }
...
// If last_command_time is non-zero but was >3 seconds ago, zero it
  // and switch off the LED.
  if (last_command_time != 0) {
    if (last_command_time < (current_time - 3000)) {
      last_command_time = 0;
      digitalWrite(LED_BUILTIN, LOW);
      digitalWrite(GREEN_LED_PIN, LOW);
      digitalWrite(RED_LED_PIN, LOW);
      digitalWrite(LEDR, HIGH);
      digitalWrite(LEDG, HIGH);
      digitalWrite(LEDB, HIGH);
    }
...
To know more about TinyML and and how the original code was developed, I strongly suggest the great book by Peter Warden and Daniel Situnayake, TinyML: Machine Learning with TensorFlow Lite on Arduino and Ultra-Low-Power Microcontrollers

And that’s it !
The result can be verified on the video that is in the introduction and the full modified Arduino code in my GitHub.
Conclusion
As always, I hope this project can help others find their way in the exciting world of AI, Electronics and IoT!
Please visit my GitHub for updated files: Inteligent_Voice_Assistant
Saludos from the south of the world!
See you at my next article!
Thank you
Marcelo


Hello, Marcelo!
First of all, congratulations on the project! There are many modules and you did not fail to put them in perfect details on this post.
I was wondering, however, if you could get rid of the ReSpeaker pi HAT and just make the Arduino record the speech, later passing to the Raspberry via Bluetooth or Wi-Fi.
Another questions is regarding the MFCCs. Could you share the source for those 40 Mel bins in the spectrogram and that 49 mysterious number that follows the 30ms speech window segment?
CurtirCurtir