

The idea with this tutorial is to capture tweets and to analyze them regarding the most used words and hashtags, classifying them regarding the sentiment behind them (positive, negative or neutral). We will use as a dataset, not only tweets captured from a historical database (i.e., the last 200 tweets sent by @realDonaldTrump),

but also all tweets that are being generated at an exact moment in time, for example, tweets sent at New York area that contains the works trump or wall.

For sentiment analysis, we will use VADER (Valence Aware Dictionary and sEntiment Reasoner), a lexicon and rule-based sentiment analysis tool that is specifically attuned to sentiments expressed in social media. And for tweets capture, the API Tweepy will be the chosen one!
Sentiment analysis with Vader
The simplest way to install Vader is to use pip command:
pip install vaderSentiment
Next, let’s call the library and create the “analyzer”:
from vaderSentiment.vaderSentiment import SentimentIntensityAnalyzer
analyser = SentimentIntensityAnalyzer()
You can simply enter with a text string on the below function to get the score:
analyser.polarity_scores("The movie is good")
The result will be a dictionary:
{'compound': 0.4404, 'neg': 0.0, 'neu': 0.508, 'pos': 0.492}
That means that the sentence is almost half positive (‘pos’: 0.492), more or less neutral (‘neu’: 0.508) and no way negative (‘neg’: 0.0). The most important result is, in fact, the score: ‘compound’, that can state that the text is “Good”. Let’s analyze the same sentence, but with a negative sentiment:
analyser.polarity_scores("The movie is bad")
and the result:
{'compound': -0.5423, 'neg': 0.538, 'neu': 0.462, 'pos': 0.0}
The Positive, Negative and Neutral scores represent the proportion of text that falls in these categories, and the Compound score is a metric that calculates the sum of all the lexicon ratings which have been normalized between -1 (most extreme negative) and +1 (most extreme positive).
So, we conclude that only looking for ‘Compound’ result, the text must be shown a negative sentiment.
More than that, you can have degrees of this sentiment:
“The movie is very bad” ==> Compound: -0.5849
“The movie is VERY BAD” ==> Compound: -0.7398
“The movie is VERY BAD!!!” ==> Compound: -0.7984
And so on…
For a more detailed tutorial regarding Vader, please see this Medium article: Simplifying Sentiment Analysis using VADER in Python
Returning to our analysis, the Compound score has a range of [-1, 1], being:
- [-1 to 0): negative,
- [0]: neutral
- (0 to +1]: positive
So, let’s write a function to capture only this 3 states of a generic text:
def sentiment_analyzer_scores(text):
    score = analyser.polarity_scores(text)
    lb = score['compound']
    if lb >= 0.05:
        return 1
    elif (lb > -0.05) and (lb < 0.05):
        return 0
    else:
        return -1
Testing…
- sentiment_analyzer_scores(“The movie is VERY BAD!!!”) ==> Result: -1
- sentiment_analyzer_scores(“The movie is long!!!”) ==> Result: 0
- sentiment_analyzer_scores(“The movie is VERY BAD!!!”) ==> Result: -1
Using Vader in other languages
The Vader is really a great tool but unfortunately is all build over the English language. But if you as me leave on countries that speak other languages, you can easily create a “turnaround” and translate your text from its original language to English before applying Vader.
For that, we will use Googletrans, a free and unlimited python library that implemented Google Translate API (for details, please refer to the API Documentation).
To install Googletrans, you can use pip command:
pip install googletrans
Same as we did with Vader, let’s import the library and call the translator:
from googletrans import Translator
translator = Translator()
Let’s test a simple translation from Spanish:
translator.translate('hola, todo bien?').text
The result:
'hello, all right?'
Let’s try a “sentiment analysis” of a Spanish text: “la pelicula es mala” (“the movie is bad”)
text = translator.translate('la pelicula es mala').text
analyser.polarity_scores(text)
The result:
{'compound': -0.5423, 'neg': 0.538, 'neu': 0.462, 'pos': 0.0}
Exactly the same result that we got at the start! Great! So, we can update the previous function to now, get the sentiment analysis of any text in any language!
def sentiment_analyzer_scores(text, engl=True):
    if engl:
        trans = text
    else:
        trans = translator.translate(text).text

    score = analyser.polarity_scores(trans)
    lb = score['compound']
    if lb >= 0.05: return 1
    elif (lb > -0.05) and (lb < 0.05): return 0
    else: return -1
Note that at first, I tested if the language is “English”, if yes, no need for translation and we can use Vader, straight away, even without internet connection. Of course, for other languages, Internet connection is mandatory, because Google Translate API needs to access its online service.
Of course, you can inform the translator the language you are using, but in our case, we will leave this to Google that does this job very well. For example, the text in Portuguese: “The day is beautiful, with a lot of sun”:
text = 'o dia esta lindo, com muito sol'
sentiment_analyzer_scores(text, False)
will result in a “Positive Sentiment: 1”.
Great! At this point, we can analyze the sentiment behind text in practically any language! So, why not get out “text” from tweets? This will be our next move!
Preparing Tweepy to capture tweets
For starting, let’s install Tweeppy:
pip install tweepyIt is important to point that Twitter requires all requests to use Oauth for authentication. This tutorial takes into consideration that you are in fact a Twitter Developer, having all the necessary “keys” to access tweets.
Tweepy tries to make OAuth as painless as possible for you. To begin the process we need to register our client application with Twitter. Create a new application and once you are done you should have your consumer token and secret. Keep these two handy, you’ll need them. For more details, please, go to Authentication Tutorial.
Once Tweepy is installed and having all tokens on handy, let’s start:
import tweepy
Get authorization:
consumer_key = 'YOUR KEY HERE'
consumer_secret = 'YOUR KEY HERE'
access_token = 'YOUR KEY HERE'
access_token_secret = 'YOUR KEY HERE'

auth = tweepy.OAuthHandler(consumer_key, consumer_secret)
auth.set_access_token(access_token, access_token_secret)

api = tweepy.API(auth)
That’s it! You are ready to capture tweets!
Reading and analyzing tweets from an id
For starting, I will get a few tweets from my university:
tweets = api.user_timeline('@ingenieriaUDD_', count=5, tweet_mode='extended')
for t in tweets:
    print(t.full_text)
    print()
The result:

Great! But, only printing tweets will not help us in our Data Science conquer! We will need to have them on a dataset (at this point, only a list) for future analysis. So, a simple function will help us with that:
def list_tweets(user_id, count, prt=False):
    tweets = api.user_timeline(
        "@" + user_id, count=count, tweet_mode='extended')
    tw = []
    for t in tweets:
        tw.append(t.full_text)
        if prt:
            print(t.full_text)
            print()
    return tw
How about Donald Trump tweets?
user_id = 'realDonaldTrump'
count=200

tw_trump = list_tweets(user_id, count)
On tw_trump we will have a list where it list item is one of Trump’s tweets. For example, let’s see one of the 200 tweets saved on our list:

Well, it is OK, but we can see that there are some parts of the tweets that in fact does not help us to analyze its sentiment, like URLs, some other user_ids, numbers, etc. We should do some cleaning:
def remove_pattern(input_txt, pattern):
    r = re.findall(pattern, input_txt)
    for i in r:
        input_txt = re.sub(i, '', input_txt)
    return input_txt
def clean_tweets(lst):
    # remove twitter handles (@xxx)
    lst = np.vectorize(remove_pattern)(lst, "@[\w]*")
    # remove URL links (httpxxx)
    lst = np.vectorize(remove_pattern)(lst, "https?://[A-Za-z0-9./]*")
    # remove special characters, numbers, punctuations (except for #)
    lst = np.core.defchararray.replace(lst, "[^a-zA-Z#]", " ")

    return lst
ANd now, our clean tweet:

How about the sentiment on this tweet?

Yes, clearly a positive sentiment (“1”).
Of course, we can much better than this. Let’s create a function to capture and display on a plot the sentiment of all 200 last tweets of Donald Trump:
def anl_tweets(lst, title='Tweets Sentiment', engl=True ):
    sents = []
    for tw in lst:
        try:
            st = sentiment_analyzer_scores(tw, engl)
            sents.append(st)
        except:
            sents.append(0)
    ax = sns.distplot(
        sents,
        kde=False,
        bins=3)
    ax.set(xlabel='Negative                Neutral                 Positive',
           ylabel='#Tweets',
          title="Tweets of @"+title)
    return sents
The return of this function is a list with the sentiment score result (-1, 0 or 1) of each individual tweet used as an input parameter.

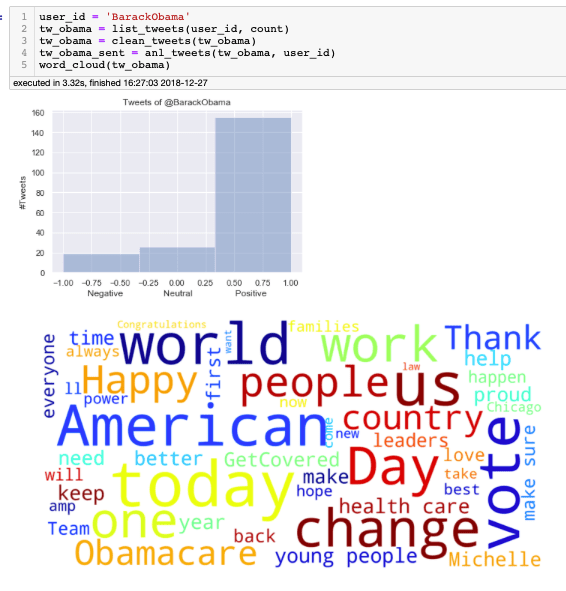
Analyzing tweets with Word Cloud
Another interesting quick analysis would be a take a peak on the “Cloud Word” generated from a list of tweets. For that, we will use word_cloud, a little word cloud generator in Python. Read more about it on the blog post or the website.
First, install word_cloud:
pip install wordcloudNow, let’s create a general function for generating a word cloud from a tweet list:
def word_cloud(wd_list):
    stopwords = set(STOPWORDS)
    all_words = ' '.join([text for text in wd_list])
    wordcloud = WordCloud(
        background_color='white',
        stopwords=stopwords,
        width=1600,
        height=800,
        random_state=21,
        colormap='jet',
        max_words=50,
        max_font_size=200).generate(all_words)

    plt.figure(figsize=(12, 10))
    plt.axis('off')
    plt.imshow(wordcloud, interpolation="bilinear");

Now that we have all functions defined, we can replicate this analysis for any group of tweets generated by any tweeter. Let’s try the same for all last 200 tweets of Obama:
Streaming tweets for a specific filter
The Twitter streaming API is used to download twitter messages in real time. It is useful for obtaining a high volume of tweets, or for creating a live feed using a site stream or user stream. Tweepy makes it easier to use the twitter streaming API by handling authentication, connection, creating and destroying the session, reading incoming messages, and partially routing messages.
The most important parameters in creating a tweet real-time listener:
track
A comma-separated list of phrases which will be used to determine what Tweets will be delivered on the stream. A phrase may be one or more terms separated by spaces, and a phrase will match if all of the terms in the phrase are present in the Tweet, regardless of order and ignoring case. By this model, you can think of commas as logical ORs, while spaces are equivalent to logical ANDs (e.g. ‘the twitter’ is the AND twitter, and ‘the,twitter’ is the OR twitter).
language
This parameter may be used on all streaming endpoints, unless explicitly noted.
Setting this parameter to a comma-separated list of BCP 47 language identifiers corresponding to any of the languages listed on Twitter’s advanced search page will only return Tweets that have been detected as being written in the specified languages. For example, connecting with language=en will only stream Tweets detected to be in the English language. Other language codes:
– en: English
– es: Spanish
– pt: Portuguese
follow
A comma-separated list of user IDs, indicating the users whose Tweets should be delivered on the stream. Following protected users is not supported. For each user specified, the stream will contain:
– Tweets created by the user.
– Tweets which are retweeted by the user.
– Replies to any Tweet created by the user.
– Retweets of any Tweet created by the user.
– Manual replies, created without pressing a reply button (e.g. “@twitterapi I agree”).
locations
A comma-separated list of longitude, latitude pairs specifying a set of bounding boxes to filter Tweets by. Only geolocated Tweets falling within the requested bounding boxes will be included—unlike the Search API, the user’s location field is not used to filter Tweets. Each bounding box should be specified as a pair of longitude and latitude pairs, with the southwest corner of the bounding box coming first. For example:
-122.75,36.8,-121.75,37.8 ==> San Francisco
-74,40,-73,41 ==> New York City
A function will be created to easily handle any error that could appear during the “listening”. One of the parameters will be the time (in seconds) that we must keep our window open. The function will automatically save the captured tweets on a .csv type file, for posterior data analysis.
The bellow function was inspired on original code, found at :
https://stackoverflow.com/questions/38281076/tweepy-streamlistener-to-csv
def twitter_stream_listener(file_name,
                            filter_track,
                            follow=None,
                            locations=None,
                            languages=None,
                            time_limit=20):
    class CustomStreamListener(tweepy.StreamListener):
        def __init__(self, time_limit):
            self.start_time = time.time()
            self.limit = time_limit
            # self.saveFile = open('abcd.json', 'a')
            super(CustomStreamListener, self).__init__()

        def on_status(self, status):
            if (time.time() - self.start_time) < self.limit:
                print(".", end="")
                # Writing status data
                with open(file_name, 'a') as f:
                    writer = csv.writer(f)
                    writer.writerow([
                        status.author.screen_name, status.created_at,
                        status.text
                    ])
            else:
                print("\n\n[INFO] Closing file and ending streaming")
                return False

        def on_error(self, status_code):
            if status_code == 420:
                print('Encountered error code 420. Disconnecting the stream')
                # returning False in on_data disconnects the stream
                return False
            else:
                print('Encountered error with status code: {}'.format(
                    status_code))
                return True  # Don't kill the stream

        def on_timeout(self):
            print('Timeout...')
            return True  # Don't kill the stream

    # Writing csv titles
    print(
        '\n[INFO] Open file: [{}] and starting {} seconds of streaming for {}\n'
        .format(file_name, time_limit, filter_track))
    with open(file_name, 'w') as f:
        writer = csv.writer(f)
        writer.writerow(['author', 'date', 'text'])

    streamingAPI = tweepy.streaming.Stream(
        auth, CustomStreamListener(time_limit=time_limit))
    streamingAPI.filter(
        track=filter_track,
        follow=follow,
        locations=locations,
        languages=languages,
    )
    f.close()
Let’s test the function, listening for all tweets that people are generating at this exact moment regarding Trump and his famous wall! 😉
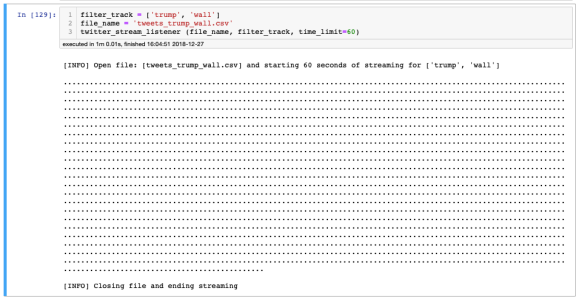
Each tweet is a “dot” that is printed on Jupyter Notebook, this help to see that the “listener is active and capturing the tweets. A file (tweets_trump_wall.csv) was generated and saved on the same directory where the notebook is located.
A lot of tweets were captured during this 60 seconds window time. This makes sense because we do not restrict language or location for example.
Analyzing tweet dataset with Pandas
I could say that work is almost done here. We now have a dataset in .csv format where the real-time tweets were captured. Now, let’s in (almost) real-time read the file using our old and good Pandas and proceed with dataset cleaning and exploration phase!
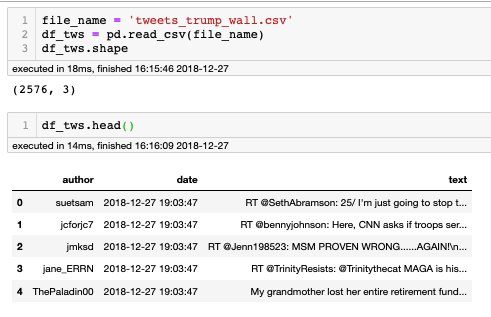
In 60 seconds 2,576 tweets were captured. the dataset has 3 columns, one for the author, one for date and a 3rd one with the tweet text. On this tutorial, we will be interested only in the last one, but it is interesting to have all 3 infos on hand for more complex analysis (like in Network Science).
On a Network Science project, would be interesting also to separate the innitial part of the tweets that contain the id of to whom the sender are replying (RT @xxx:). Here we will clear it.
As we did before, the first thing to do is cleaning the dataset, using the same function created before:

Now we will generate a new column, where we will store the sentiment analysis of each individual tweet.

And let’s see the word cloud of it:

Exploring positives and negatives tweets
At this point, we can filter the tweets, splitting them in positive and negatives, doing whatever analysis we think interesting. For example, what would be the word cloud for each group of tweets?

Collecting Hashtags
The last analysis that we will perform will about take a look at the hashtags that are generated in each situation. For that, we will use functions developed by Prateek Joshi on this tutorial: Comprehensive Hands on Guide to Twitter Sentiment Analysis with dataset and code. I recommend a visit to his website. I learned a lot with Prateek.
def hashtag_extract(x):
    hashtags = []
    # Loop over the words in the tweet
    for i in x:
        ht = re.findall(r"#(\w+)", i)
        hashtags.append(ht)
    return hashtags
# extracting hashtags from positive tweets
HT_positive = hashtag_extract(df_tws['text'][df_tws['sent'] == 1])

# extracting hashtags from negative tweets
HT_negative = hashtag_extract(df_tws['text'][df_tws['sent'] == -1])

# unnesting list
HT_positive = sum(HT_positive,[])
HT_negative = sum(HT_negative,[])

Conclusion
That’s all, folks!
Before we go, I would like to thanks professor Claudio Aracena, from my Data Science Master at UDD Chile, that inspired me on this article.
As usual, you can find the Jupyter Notebook on my data repository: Git_Hub.
Saludos from the south of the world!
See you in my next post!
Marcelo


